HealthyLife is a part of www.WeRIndia.com, an all India – centric website (https://healthylife.werindia.com) and is solely owned and operated by WeRIndia.com. It is a Indian nutritional portal providing educational articles.This nutritional port was launched on February 5th, 2015.
Kitchen hacks one should know
Some kitchen hacks are really useful and makes our kitchen work easy.
If you are using cutting board to cut vegetables and cutting board is moving chances of cutting your fingers is always there. Don’t worry, place a damp paper towel under the cutting board and it is secured in one place
To peel ginger skin, if you don’t have a peeler or misplaced it use a spoon instead of knife.
To peel garlic cloves, take whole garlic and separate cloves by putting pressure. Transfer the cloves in a bottle, put the lid and shake well.
Other way to peel garlic clove is, keep cloves in a microwave container and warm it for 15 secs. Now it is easy to peel the garlic skin.
If butter is too hard and have difficulty in spreading on toast all you need to do is, take a knife and glass of hot water. Dip knife in the water and cut the butter.
If the bread or bun that you bought from store becomes hard and not yet expired, take the bread and cover with a wet paper towel. Bake for 5 minutes. Bread or bun, it becomes soft. Alternatively you can keep in microwave for few seconds.
To keep cut fruits from browning, mix lemon juice with honey and sprinkle on the cut fruits.
To remove seeds from cucumber and squash fruit, use a ice-cream scooper.
If you find it hard to peel citrus fruit skin, microwave fruit for just few seconds and peeling of skin becomes easy!
To stop onions hurting and tearing your eyes, after peeling keep onion for few minutes in freezer. Or hold a bread piece in your mouth. It absorbs Sulfur from onion.
If you cannot spread the hard butter, then use a grater to grate it like cheese and spread it on the bread
If honey in the kitchen is crystallized, take a bowl of water and boil it. Place the honey container in the hot water bowl – you will get de-crystallized honey.
To keep left over cakes for few more days, keep sliced breads with cake. Bread keeps the cake moisture for sometime.
To get clear ice cubes, boil and cool the water before putting in ice cube maker.
To avoid mess while boiling liquids or broth in a pot, place a wooden spoon across on top of the pot. Being a poor conductor of heat, wooden peace stops over boiling and the mess.
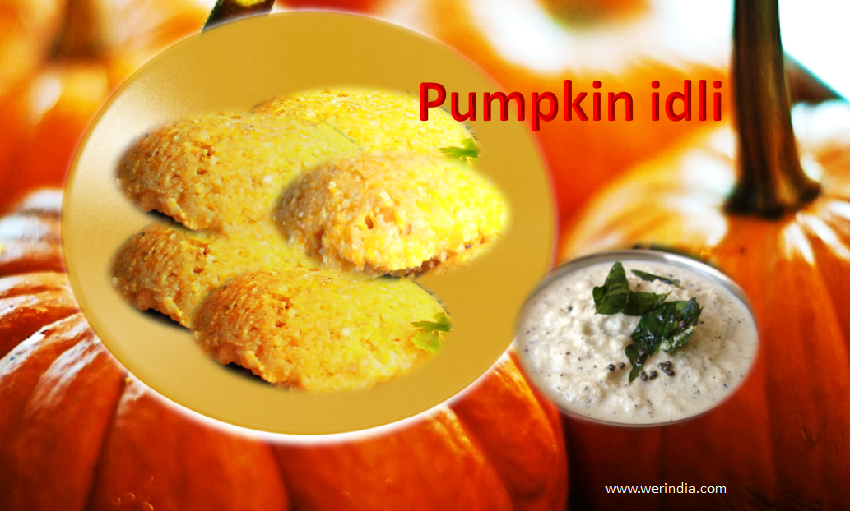
Sweet pumpkin has a special place in Halloween celebrations. Carving pumpkins into jack-o’-lanterns is a popular Halloween tradition. Without sweet pumpkins and dishes prepared with sweet pumpkin, Halloween is not enjoyable. Bread, soup, pie – so many varieties of dishes are prepared using pumpkin. This Halloween try a special dish from India. This is similar to traditional idli with pumpkin as the main ingredient. In local language it is called “kadabu” – Sweet pumpkin Idli.
What is in sweet pumpkin that is nutritious?
Sweet pumpkins are low in calories, fat and sodium and are rich in dietary fiber. They provide good amount of Vitamin A, Vitamin B, Vitamin E, potassium, copper and iron.
Recipe for Pumpkin idli:
Ingredients:
Grated pumpkin – 2 cups
Finely chopped pumpkin – ½ cup
Coarse rice – ½ cup
Jaggery (powdered) – ½ cup
Coconut (grated) – ¼ cup
Coconut pieces – 2 Tbs
Salt – as per your taste (less is better)
Cardamom powder – little
Poppy seeds – 1 or 2 tsp
Water – 1 cup
Preparation:
Dry roast coarse rice for few minutes or until it gives slight aroma
Dissolve jaggery in little water and boil jaggery for few minutes.
Add chopped and grated pumpkin, coconut grated and pieces, salt, poppy seeds, coarse rice and cardamom into jaggery water and mix well.
Bring the above mix to idli dough consistency. Not too thin. Keep it aside for half an hour.
Apply little oil on idli plates or idli cups.
Pour the pumpkin mix into cups or plates and steam cook in a cooker for fifteen minutes.
Turn of the heat and allow it to cool. Check whether idlis are cooked or not by inserting edge of knife inside idli. If it is cooked there wont be stickiness in the knife edge.
Remove pumpkin idli using a spoon. Dip spoon in cold water and slowly remove idli one by one. If you are using idli plate, cut them to square shape using a knife.
Starting next year 2018 Gucci, the Italian Fashion Luxury brand is going fur-free. Marco Bizzarri, the CEO of Gucci announced this move in his recent talk in London College of Fashion.
Gucci is famous for its animal fur coat products. According to Bizzarri, Gucci will no longer use any type of animal fur including mink, coyote, fox, rabbit, sheep (Karakul, Swakara or Persian Lamb). These animals in fur industry are subjected to intense cruelty, living their entire lives in filthy cages and are miserable to watch.
The change has come based on the idea of Gucci’s creative director Alessandro Michele who joined the company two years back (2015).
Gucci going fur -free is a game changer – Kitty Block, Humane Society International President.
The remaining fur clothing that are in Gucci’s hold will be sold in an auction and the money made by auction will be donated to animal rights organizations, Humane Society International and LAV – members of the Fur free alliance FFA – an organization well known to initiates legal actions to assert animal rights.
Nearly a staggering one hundred million animals are sacrificed for the fur industry. It can be stopped only when the Fashion designers stop recommending and using fur.
Marco Bizzarri, in his statement said that ‘Being socially responsible is one of Gucci’s core values, and we will continue to strive to do better for the environment and animals”. With the help of animal rights organizations Gucci is ready to take the next steps. HSUS and LAV is going to support Gucci in identifying and reducing the impacts on both environment and animals.
Gucci thus is joining other leading Fashion brands in going cruelty free product. Other brands who have taken similar good step are Armani, HUGO BOSS, YOOX Net-a -Porter, Stella McCartney to name a few. Gucci is also will be part of the International Fur free retailer program.
Gucci’s this bold step is a good game changer for the whole luxury fashion industry to follow. This bold step will have a huge ripple effect throughout the world of fashion. It means the world fashion in future will be FUR-FREE !!
In Hindu mythology Matsya or fish is incarnation of Lord Vishnu. Matsyavatara is the name for this incarnation and the belief is that all yogis and saints were protected and carried to safe place by the Lord in fish pose.
Thus the wisdom and knowledge were saved for the benefits of everyone on the planet. In Yoga, the benefit of doing Matsyasana or fish pose is: proper blood circulation to brain, helps in focusing. When we feel we are out of balance fish pose helps us to be focused and get back to normalcy in life.
It also has positive benefits on four chakras situated in lower and upper abdomen, above heart and throat region. Balancing chakra means balancing mind and body.
.
With these, other benefits include reducing thyroid problem, back pain, stretching abdominal and thigh muscles – www.healthylife.werindia.com
LEVEL : Intermediate
Anatomy : Abs, Chest, Hips, Neck, Throat
Pose Type: Backbend, Heart Opener, Supine
Sanskrit: Matsyasana (mot-see-AHS-anna), matsya = fish
BENEFITS
Stretches the chest and the front of the throat
Opens the pectorals, hip flexors, and intercostal muscles between the ribs
Stimulates organs in the throat and abdomen
Strengthens the upper back and neck musculature
Opens the accessory muscles of breathing
Releases tension in the thoracic spine and mid-back
Lie flat on your back with your feet together and legs extended in front of you. Rest your arms alongside your body.
Press your elbows and forearms into the ground, and begin to lift your chest, creating an arch in the upper back. Draw your shoulder blades together and lift your upper torso off the ground.
Tilt your head back and continue lifting your chest until you can bring the top of your head to the floor. Keep pressing through your arms. There should be very little weight resting on your head.
Keep your thighs engaged and press through your heels to lengthen the legs. Continue to deepen the arch in your thoracic spine and breathe.
Hold this pose for 15 to 30 seconds.
To release, inhale and lift your head off the floor. As you exhale, lower your head and torso to the ground. Bring your knees into your chest for a counter stretch.
Lay with a bolster underneath the shoulders and allow the head to drop back. This opens the chest and relieves pressure on the back of the neck and head.
SEQUENCING TIPS
Before:
Salamba Sarvangasana (Shoulderstand)
Setu Bandha Sarvangasana (Bridge pose)
Bhujangasana (Cobra pose)
Urdhva Mukha Svanasana (Upward-Facing Dog)
After:
Ustrasana (Camel pose)
Virasana (Hero pose)
Savasana (Corpse pose)
TEACHING CUES
Make sure to support your weight on your elbows and forearms, not the top of your head.
Really arch the upper back and open your heart.
Reach out through your heels and point the toes to lengthen your legs.
VARIATIONS
Lift your arms overhead and join the palms together. Then reach back and touch the floor behind you.
Begin in Padmasana (Lotus pose) and recline down to the ground. Then follow steps 2-7, keeping the legs crossed.
WATCH OUT FOR
Too much pressure on the head
Hyper-extending the neck or throat
This article and image published here with prior permission from beyogi.com
Many reasons can cause dizziness and vertigo. For simple dizziness that comes and goes one can try few home remedies.
Water: Dehydration is one the reason that can worsen the dizziness. Drink plenty of water and a glass of cold water when you feel the symptom of dizziness helps
Ginger tea: Congestion can also cause dizziness. Reduce congestion by drinking hot ginger tea.
Humidifier: Running a humidifier with Vicks or eucalyptus oil can help to reduce congestion and dizziness.
Hot steam treatment: To boiling water add few drops of eucalyptus oil. Keep the vessel on a table. Cover your head with towel and expose your face to steam.
Indian gooseberry: Soak fewgooseberry pieces (raw or dried) in a glass of water and drink in empty stomach in the morning.
Chamomile tea: Dizziness can happen due to anxiety and over worked nerves. Reduce tension and relax nerves by drinking chamomile tea.
Pumpkin seeds and almond: To a table spoon of pumpkin seeds add 12 almonds and three tablespoons of wheat and soak overnight. Next day morning grind this with 2 cloves to a paste. Boil milk and add this mix. Coll and drink this. Repeat this for few days. Either you can make fresh or prepare and store in refrigerator.
Turmeric milk: Drinking turmeric milk with saffron and little sugar helps to sleep. Sleeplessness is one of the reason for dizziness.
Lemon juice with pepper: Mix lemon juice in water and add crushed black pepper (1/4 tsp). Add a pinch of salt to it. Drink once or twice a day. Gives relief from dizziness.
Fenugreek, ajwain and coriander seeds: Soak one tsp of each of these in 16 oz water. Boil and drink this water. This helps in digestion and releases any dizziness symptoms due to nausea and indigestion.
Coriander seeds and gooseberry: Overnight Soak equal amount of Indian gooseberry powder and coriander seeds in a cup of water. Strain this water and drink.
Citrus fruit peels: Smelling citrus fruit peels reduces dizziness. You can also powder a tsp of dry peels and mix with yogurt and consume.
Essential oil help: Peppermint and lavender oil massaging on forehead helps to improve circulation and reduces anxiety and dizziness.
Dry ginger in salt:Chewing lightly salted dry ginger helps to reduce nausea and dizziness.
Cut down oily food: Eating oily food and junk food can result in uneasiness and can drain energy. This may result in dizziness symptoms.
Reduce coffee and alcohol: Consumption of these two drinks can cause dizziness. Reduce both coffee and alcohol consumption.
Sitting in Sun for a long time: Yes, Sun gives vitamin D. However, sitting in Sun for longer hours can dehydrate the system resulting in dizziness. Try to use a shadow over your head or carry an umbrella if at all you must be in Sun.
Yoga poses helps: Child pose, downward dog, viparita karani (or leg against wall pose), plough pose or halasana, head stand and shoulder stand – these are recommended for blood circulation and helps in reducing dizziness.
Sleep: Getting good amount of sleep helps to recover from dizziness. Lack of sleep or disturbed sleep can only make it worse. Instead of late nights, go to bed on time and get enough amount of sleep. It really helps.
Grandma’s remedies – www.healthylife.werindia.com
Image credit: Image by kalhh from Pixabay (Free for commercial use)
Fry 1 tsp cumin seeds, ½ tsp black pepper. To this add 2 or 3 Indian gooseberries, hing (asafetida) and grind with ½ cup fresh grated coconut. Mix this with curd, add salt. You can have this with rice or eat few spoons in the afternoon.
To one cup buttermilk add 1 tsp pepper powder, 1 tsp dry neem powder and 1 tsp turmeric powder. Add little salt for taste, mix and drink.
For 1 cup curry leaf, add few black pepper, 1 tsp cumin, little asafetida and salt to taste. Grind to fine powder. Mix with rice and ghee – have this twice a day for a week beginning of lunch or dinner. This increases appetite and metabolism.
Take few 20 garlic cloves, add little turmeric and salt. Fry this in 1 tsp oil. Have this either in empty stomach or as a side dish with your meal. You can add this to salad too. This increases appetite and metabolism.
Take 1 inch ginger – to this add ½ cup grated coconut, hing and salt. Grind and mix with thick buttermilk or curd. Mix with rice and have in the afternoon.
Cut tender radishto thin discs. Add salt and black pepper powder and have it before meal.
Prepare powder using sweet flag, coriander and cumin seeds. Store in an air tight container. Prepare khashayam (traditional tea), add milk and drink.
To hot water, add little clove powder and drink once or twice a week in the morning hours. This helps to clear the stomach and increases appetite.
To tender coconut water add little jaggery and grated ginger – drink this two times a day. This helps to cool the system, increases appetite.
Dry roast onion, add little jaggery and consume during dinner time. This helps to get sleep and increases metabolism too.
Turmeric water – To one cup boiling water, add ½ tsp turmeric powder and bring water content to half. Add little pepper powder and drink. This clears the stomach, intestine and helps to get back normal appetite.
Prepare tamarind pulp in water (½ lemon size tamarind pulp and 2 cups water). To this add 3-4 cloves, ½ inch cinnamon, a little pepper and sugar. Boil this water. Drink ½ glass every day or alternate days to improve appetite. (If you have acidity then drink this twice a week).
Grate ginger and mix with little jaggery. Consume a tea spoon of this every morning with breakfast.
Indian Pickles – Indian gooseberry, lemon and tender mango pickle with rice porridge, curd rice or millet porridge. Pickles increases taste bud action and appetite.
Grind – ½ coriander /cilantro, ¼ cup mint leaves with 1 green chilli, pinch of asafetida, 1 tsp cumin and salt as per your taste with little buttermilk. Remove and add more buttermilk and have a glass of this delicious and spicy buttermilk drink one hour before to lunch. Coriander and mint together will increase metabolism and appetite.
Issues surrounding GM Mustard commercialization in India
On May 11 of this year, India’s first genetically modified GMO Mustard has been recommended by environmental ministry for commercial approval. This GMO was developed by Delhi University.
Few countries including US and Canada are growing few GM crops. Whereas many other countries are rejecting it these crops because of the possible ecological risks linked to GMO technology.
In India, the recommendation has come as a shock as the issue is more complex. The complexity is because in India millions of farmers own small independent landholdings. At present mustard is grown in around 7 million hectares across in India. Introducing GMO crop can lead to monocropping (similar to Bt cotton) and big corporates will lobby to take control of the crop.
What are the issues related to this GM crop?
Mustard is one the most important winter crops of India. One of the biggest concern is once this first GM crop is approved, then other GM crops could ask for the recommendation and make their way to crop filed. It is a known fact that more than hundreds of GM food cropsare waiting to enter Indian agriculture field.
The scientific data is not revealed so far and it is hidden by developers and law regulators. Field trials and stages of GM crop development has not come in front of public eyes.
There is no clear information about the yield comparison. Developers claim that it is a high yielding crop however activists assert that the yield was compared to old low yielding varieties of mustard. The more yield does not guarantee more income to farmers. Farmers are afraid of fair price in the market because of their bitter experiences with procurement agencies in recent years. On the contradictory, the lead crop researcher of Delhi University Dr. Deepak Pental, has conceded that the GM mustard in question, has not been (even) tested against non-GM varieties!! Then how one can argue that GM mustard increases productivity when compared to other varieties?
Mustard is grown along with other crops. As per the reports new GM mustard seed is also tolerant to herbicides. It means the other crops cannot with stand herbicides that are sprayed to kill the weeds around GM mustard.
India is known for its rich genetic heritage and known for its crop diversity. The big concern is about contamination of mustard heritage by GM crop. Just like Brinjal, mustard also has rich genetic heritage. If there is cross pollination mustard’s unique 65 different varieties could get contaminated (with GMO).
With all these raising concerns the Supreme Court of India in June asked the Central Govt. to provide the report on adverse effect of GMO mustard based on the research. Aruna Rodrigues, filed a case to stop the commercialization of GM mustard in India. Earlier the bench comprising Chief Justice J S Khehar and DY Chandrachud had said that if the government takes a decision in favor of GM mustard crop then the court would like to hear the petition challenging the commercial release. Recently, the court had asked the center to get public opinion on such GM seeds before releasing it to commercial purpose.
There are many cooking tips available for those who would like to cook.
These tips are very helpful while cooking for various reasons.
Some tips to improve taste, some to give texture to dishes, some to store vegetables for long time, proper way of cooking tips and few are for health reasons – all are for good reasons.
Grandma is giving 18 such everyday essential cooking tips here – try it:
Softer rotis: Add lukewarm water while mixing and kneading the dough.
Garlic peeling: When you have time peel garlic (like watching TV) and store them in airtight container with a tissue paper lining inside.
Green herbs: To keep herbs like cilantro and curry leaves fresh, store them in airtight containers. Remove cilantro roots before storing.
Soak daal: To prepare any types of daal, soak daal in hot water for about three hours before cooking. This enhances the flavor.
Rice water: Don’t throw washed rice water. Mix little jaggery and cardamom powder and drink. This reduces thirst and gives energy.
Potato crispy curry: To make crispy potato, soak cut potato in cold water for an hour and prepare curry adding your regular spices.
Green spinach dish: To keep the green look, don’t close the lid while cooking spinach or palak. If you close the lid, it will lose color.
Fluffy rice: To get fluffy rice add a tbs of lemon juice while cooking the rice.
Basin flour help: If your curry or sambar is watery and thin, to make it thick – add a Tbs of basin flour (gram flour) to the dish.
Crispy poori: To make crispy poori, while kneding dough add little small rava or rice flour and this gives crispiness.
Okra cooking: To remove stickiness in okra, while cooking add a Tbs of yogurt or a tsp of lemon juice.
Softer paneer: To make soft paneer dish, soak paneer cubes in little salt water for few minutes and remove.
Remove excess salt: To remove excess salt from dish add few boiled potatoes in the dish – potato absorbs excess salt.
Aloo bonda: To give flavor to aloo bonda along with cilantro, add few chopped mint leaves. This gives a good taste.
Storing tomato: Avoid storing tomato in refrigerator. Instead, keep them in a vessel and close with a lid.
Cashew, sesame mix: Roast few cashew and sesame. Grind to a powder and add this to gravy to make it tasty and thick.
Crisp pakoda: Add little corn flour to make crispier pakoda/pakora/fritters.
Hing and ginger for the rescue: To avoid gas formation when preparing dishes using legumes – daal, rajma and other lentil, add hing or asafetida and grated ginger. Both will keep stomach health!