
Brain aneurysm
All types of headaches are not just headaches or migraine. Sometimes a person can feel the worst headache that is unbearable and if not taken care it could be fatal.
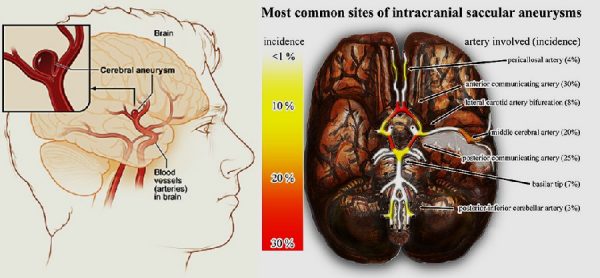
Brain aneurysm is also known as cerebral aneurysm. It is a weak bulged spot on the brain wall artery which appears like a thin balloon. This building interferes with the blood flow and artery pounds against the weakened wall and results in wear and tear of arteries. This pressure that builds up can result in the rupturing of artery and blood will escape to the space around. Generally, the ruptured brain aneurysm needs an advanced surgery as treatment.
It is hard to differentiate between brain aneurysm and a migraine. However, if a person feels a sudden rushed and exploding headache it could be due to brain aneurysm.
Symptoms of Brain Aneurysm
- Blurred or double vision
- Feeling numbness in the face
- Often becoming unconsciousness
- Seizures attack
- Becoming overly sensitive to light
- Severe headache that is unbearable
- Localized Headache
- Dilated pupils
- Pain above and behind eye
- Weakness and numbness
- Difficulty in speaking
When to seek medical help?
If a person is experiencing any or all of these below mentioned symptoms it is better to contact your doctor.
- Sudden severe headache, the worst headache of your life
- Loss of consciousness
- Nausea/Vomiting
- Stiff Neck
- Sudden blurred or double vision
- Sudden pain above/behind the eye or difficulty seeing
- Sudden change in mental status/awareness
- Sudden trouble walking or dizziness
- Sudden weakness and numbness
- Sensitivity to light (photophobia)
- Seizure
- Drooping eyelid
Treatment options:
Treatment for brain aneurysm is more promising than it was before. If aneurysm is detected and the artery is not ruptured then the option is either open surgery or endovascular approach. Surgery should be performed to prevent the bleeding or hemorrhage or immediately after hemorrhage to prevent further bleeding. In either treatment preventing bleeding or further bleeding by sealing off the aneurysm is the goal. Several factors decide the treatment options – patient age, location and size of the aneurysm, shape of aneurysm, neurological condition, other medical condition and patients’ health history.
References:
University of Miami Health system
https://www.bafound.org
Image credit: https://commons.wikimedia.org/wiki/File:Cerebral_aneurysm_NIH.jpg
Attribution:en:National Institutes of Health / Public domain
English: Nicholas Zaorsky, M.D. / CC BY-SA (https://creativecommons.org/licenses/by-sa/3.0)
Author: HealthyLife | Posted on: November 28, 2017
« Natural Home Remedies for Cold, Congestion and Sinus Problems Cracked heels – what is the solution? »


