All posts by HealthyLife

HealthyLife is a part of www.WeRIndia.com, an all India – centric website (https://healthylife.werindia.com) and is solely owned and operated by WeRIndia.com. It is a Indian nutritional portal providing educational articles.This nutritional port was launched on February 5th, 2015.
FSSAI Traffic light labeling measure for packaged food & drinks

FSSAI Traffic light labeling measure for packaged food & drinks

In continuing efforts to keep citizens safe, FSSAI Food Safety and Standards Authority of India is coming  with traffic light food labeling a measure for both drinks and foods.

Food safety, quality and nutritional status of food – concerning about these three key factors a draft regulation proposal states that the packaged food manufacturers and firms are required to declare few key nutritional factors in package. This includes information such as energy in terms of calories, total fat, trans-fat, total sugar and salt per serving as well as per serve percentage contribution to the recommended dietary allowance or RDA.

What will be on  traffic light food label? 

“Color-coded nutritional information tells at a glance if the food has high, medium or low amounts of fat, saturated fat, sugars and salt. For example, red means high, amber means medium, green means low”.

The packaged food will be categorized for example in red indicating higher level of fat, sugar and salt content. From time to time FSSAI might come up with color coding system for different ingredients.

GM labeling will be made compulsory to declare genetically modified ingredients in the package with introduction of draft regulation in accord with FSS (food safety standards). All those products that have 5 per cent and more of GM ingredients should be labeled. Total GM ingredients shall be on top three ingredients in terms of the percentage.

Along with this FSSAI also proposed traffic light labeling system for the foods sold in vending machines and school canteens to reduce and curb the consumption of junk foods, processed foods, confectionery and sugary drinks for children.

This proposal will restrict sale of HFSS – high fat, salt and sugar containing foods such as deep fried, sugary drinks, processed foods and confectionary in or within 50 meter of school premises.

About this draft notification of labeling and display 2018, FSSAI is seeking views, comments and suggestions from food industry and stakeholders.

References:

  • http://www.fssai.gov.in/home

Author: HealthyLife | Posted on: April 30, 2018
« »
« »

Recommended for you

Tips to clean & store jewelry at home

Tips to clean & store jewelry at home

Instead of giving certain jewelries outside for cleaning, we can use some simple techniques to clean jewelries at home itself. These simple techniques give back shining look and keeps valuable jewelries neat for many months and years. Oil, sweat, dust and oxidation are three main culprits that spoil the look of jewelry and will not look attractive.  Grandma has few tips to clean & store jewelry at home:

  1. To remove oil from gems: Use soap and water only. Take gems in hand and slowly using finger tips clean the gems using soap water. Rinse using clean water and dry by placing it on clean paper towel. There is no need to soak them in soap water.
  2. For gold jewelry: Use soap nut powder or soap nut itself. Soap nut is available in herbal shops or with jewelers. Get few dried soap nut and keep them stored for use. While using, burn the soap nut a little and dip in cold water. Take jewelry in hand and rub gently with soap nut or soap nut powder. You can make use of a separate tooth brush for this purpose. You will see foam coming out from the soap nut. After few minutes of cleaning, dip jewelry in clean water and rinse. You will see clean, shiny gold jewelry
  3. For diamonds: Soak diamond jewelries in warm water mixed with few drops of ammonia solution. After 5 to 10 minutes use very soft brush and remove the oil, dust and other particles. Diamonds will come back to original shining with this technique. When you store diamond jewelries and ear studs, put little talcum powder to keep them shining. Powder also absorbs oil from the diamond surface.
  4. Gold and gems jewelry: To clean gems studded in gold, use little white vinegar. Apply vinegar with soft cloth and clean using soft brush. Wash using warm water. Do not soak jewelry containing stones.
  5. Silver items: To clean silver jewelry and silver items use baking soda and aluminum foil. See more here. Pitambari is a powder that is available in many Indian stores. Use pitambari powder to clean silver jewelry as well as vessels and other items. It is not expensive and easy to use at home.
  6. Copper jewelry: To clean copper jewelry use salt and lemon juice mixture. Dip, douse and use water to clean. Dry on soft clothes or paper towel.
  7. Brass jewelry: To clean brass jewelry one can use white vinegar, salt and besan mix. Prepare a paste and use soft brush to apply. Brush softly and clean using water.
  8. Storing: After cleaning any jewelry dry them on soft cloths or paper towel. Before storing make sure all your items are dried thoroughly. Separate necklace, ear studs, finger ring, toe ring, hair clips, individual pendants, bangles, bracelets, pearl jewelry, diamonds etc and store them separate in jewelry box or organizers.
  • Delicate and thin gold chains should be kept individually and don’t mix them with heavy ones as chains might break by getting stuck to each other.
  • To store necklace: Store necklaces individually so that they don’t get entangled with each other and makes it easy for you to search for the one for your next wear. Consider hanging them in stands or peg rack on the wall or closet door.
  • Bracelets and bangles: Use draw organizers or hand bracelets in bangle stands.
  • Ear rings: Use porcelain cups or earring compartments. Dangling earrings are better to be hang freely in stands.

Grandma’s tips: www.healthylife.werindia.com

Indian jewelry image: https://www.anuradhaartjewellery.com/


Author: HealthyLife | Posted on: April 26, 2018
« »
« »

Recommended for you

Mixed flour dosa with peanut chutney

Mixed flour dosa with peanut chutney

Here is a breakfast or evening snack item prepared using different flour mix and served with peanut chutney. Both recipes are simple and takes less time to prepare. It is easy to digest and fills stomach fast.

Mixed flour dosa recipe:

Ingredients:

  1. Wheat flour – 1 cup
  2. All-purpose flour – 1 cup
  3. Rice flour -1/2 cup
  4. Millet flour – ½ cup
  5. Small semolina – 1 cup
  6. Coconut – 1 cup grated
  7. Cumin – 1 tsp
  8. Mustard – 1 tsp
  9. Curry leaves – few chopped
  10. Green chilli – 2
  11. Onion – finely cut ¼ cup
  12. Salt – as per your taste

Dosa preparation:

  1. Grind coconut, green chilli and cumin with little water to paste
  2. Beat yogurt in a vessel, add grinded coconut paste and mix well.
  3. Mix all flours, semolina, salt and add beaten yogurt coconut mix to batter mix
  4. Add enough water and continue mixing till you get dosa batter consistency. Keep it aside for an hour.
  5. Heat frying pan on medium heat, add oil and get ready with season by adding mustard and curry leaves.
  6. You can add onion to above seasoning and fry to golden brown or add cut raw onion to dosa mix (your choice).
  7. Add seasoning and onion to dosa mix, stir well.
  8. Place non -stick tawa on medium heat, sprinkle little oil evenly
  9. Pour a ladle of dosa batter and spread as thin as possible. Cover with a lid.
  10. After couple of minutes remove lid and turn dosa to cook other side.
  11. Serve hot dosa with peanut chutney for breakfast or evening snack.
  12. Lower the heat and pour a ladle of batter on it.

Peanut chutney preparation:

Ingredients:

  1. Peanut /ground nut – 1 cup
  2. Onion – 1 medium size
  3. Garlic – 1 or 2 cloves
  4. Red chilli – 5
  5. Curry leaves – few
  6. Tamarind – little ( ½ or 1 inch)
  7. Salt – as per your taste

For seasoning: oil, mustard, urad dal, curry leaves, little asafetida

Method:

  1. Dry roast peanuts. You can microwave on a microwave safe plate. Peel skin from roasted peanuts
  2. Place a frying pan on medium heat and add 2 tsp oil. To heated oil add garlic, onion, curry leaves, tamarind and red chilli. Sauté to remove raw odor. Turn of heat and allow contents to cool.
  3. Transfer roasted peanuts and fried ingredients to grinder and grind to a chutney consistency by addling little water.
  4. Get ready with seasoning using oil, mustard, curry leaves, asafetida.
  5. Transfer chutney to vessel and seasoned ingredients to chutney. Mix well, before serving.

Recipe: www.werindia.com


Author: HealthyLife | Posted on: April 25, 2018
« »
« »

Recommended for you

Shoulder pressing pose

Shoulder pressing pose

To boost confidence and to keep focus on our tasks Bhujapidasana or shoulder pressing pose helps.

It helps to strengthen core and tones belly, strengthens shoulder and arms.

This is an advanced yoga pose that also helps to open pelvis and hips.

Another benefit is this pose stimulates abdominal organs and reduces constipation.

Getting into this pose takes lots of practice.

Initially put pillows around so that if you loose balance you won’t hurt yourself – Healthylife

LEVEL : Advanced

Anatomy: Abs, Arms, Heart, Shoulders, Spine

Pose Type: Arm Balance

Sanskrit: Bhujapidasana  (boo-JAH-pee-DAHS-anah) bhuja = arm, shoulder pida = pressure

BENEFITS

  • Stretches the shoulders, triceps, and hip flexors
  • Tones and stimulates abdominals organs
  • Strengthens the upper spine musculature
  • Lengthens the spinal musculature and gluteals
  • Opens the pelvis and hips
  • Boosts confidence

CONTRAINDICATIONS

  • Spine pathologies
  • Hip pathologies
  • Wrist, elbow, or shoulder injury

HOW TO

  1. Start in Malasana (Garland pose). Bring the torso forward through the inner thighs.
  2. Raise your hips until they are parallel with the floor. Draw your upper arms and shoulders as far under your knees as possible. Then place your hands at the outer edges of your feet, fingers facing forward.
  3. Inhale and draw the torso forward, bringing weight into the palms of your hands. Press through the floor.
  4. Exhale and squeeze your thighs into your upper arms. Wrap your left ankle over your right ankle in front of you.
  5. Take your gaze toward your toes.
  6. Hold Shoulder-Pressing pose for 30 seconds or up to a minute.
  7. To exit, slowly release the ankles with an inhalation. Bend the elbow to settle the feet on the mat. Repeat the pose with the right ankle over the left.

MODIFY OR REPLACE

Alternatives:

  • Tittibhasana (Firefly pose)

Modifications:

  • Place blocks under the palms for support.

SEQUENCING TIPS

Before:

  1.  Bakasana (Crow pose)
  2. Malasana (Garland pose)
  3. Prasarita Padottanasana (Wide-Angle Forward Bend)
  4. Eka Pada Bakasana II (One-Legged Crane 2)

After:

  1. Malasana
  2. Adho Mukha Svanasana (Downward-Facing Dog)

TEACHING CUES

  1. Keep the abdominals firm and press through the shoulders for support.
  2. Squeeze the thighs together and press through the palms to extend the arms. Keep the shoulders engaged.
  3. Be cautious of the low spine and hips. Do not strain.
  4. Bind the feet together by wrapping one ankle on top of the other.

VARIATIONS

  • Tittibhasana (Firefly pose)
  • Eka Pada Bakasana II (One-Legged Crane Pose 2)

WATCH OUT FOR

  1. Straining the wrists, shoulders, elbows, or low back
  2. Hands lifting, instead of firmly rooting into the floor

This article and image published with permission from https://beyogi.com/


Author: HealthyLife | Posted on: April 20, 2018
« »
« »

Recommended for you

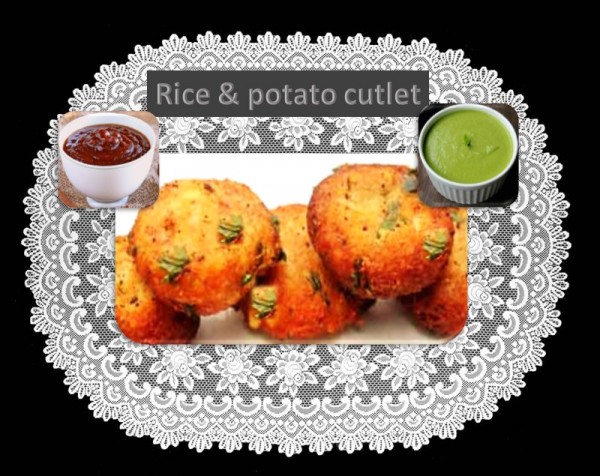
Potato and rice cutlet

Potato and rice cutlet

Is there extra, left over rice at home and don’t know what to do with it? Don’t throw rice and don’t waste it.

Prepare cutlet by mixing rice with potato!

Potato and rice cutlet is as delicious as potato or corn cutlet.

What you need?

  1. Left over rice – 1 cup
  2. Boiled potatoes – Smashed or shredded one cup
  3. Peas -1/4 cup
  4. Cumin seeds – ½ tsp
  5. Green chilli – chopped ½ Tbsp
  6. Ginger – 1 tsp finely chopped
  7. Cilantro -1 Tbsp finely chopped
  8. Salt – ½ tsp
  9. Curry leaves – few chopped
  10. Gharam masala (optional) – ½ tsp
  11. Lemon juice – ½ tsp
  12. Bread crumbs – ½ cup (optional)

Preparation:

  1. Boil potato and cook peas.
  2. In a bowl mash rice and boiled potato. And mix both well.
  3. Add rest of the ingredients – cooked peas, chilli, salt, cumin, curry leaves, ginger, garam masala, cilantro and lemon juice.
  4. Mix well to make sticky dough. Prepare small lemon size balls.
  5. Heat oil in a container on medium heat.
  6. Apply oil on your palm and roll potato dough balls to patties in your palm.
  7. Apply bread crumbs on the patties.
  8. Release coated patties carefully in the oil. Fry cutlets till they turn golden brown on both sides
  9. Remove cutlets and place it on paper towel to remove extra oil.
  10. Serve hot cutlets with your choice of green chutney or tomato ketchup!

Recipe: www.werindia.com


Author: HealthyLife | Posted on: April 19, 2018
« »
« »

Recommended for you

Indoor Hydroponic veg garden by IKEA

Indoor Hydroponic veg garden by IKEA

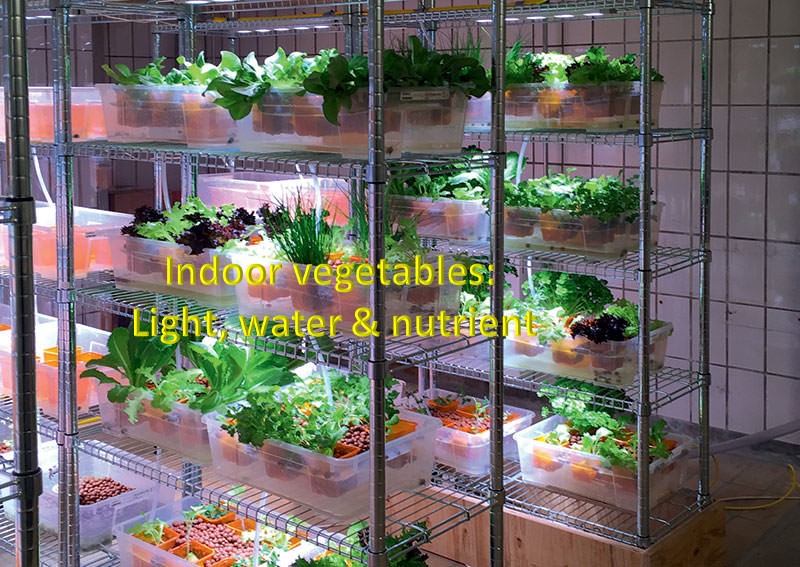
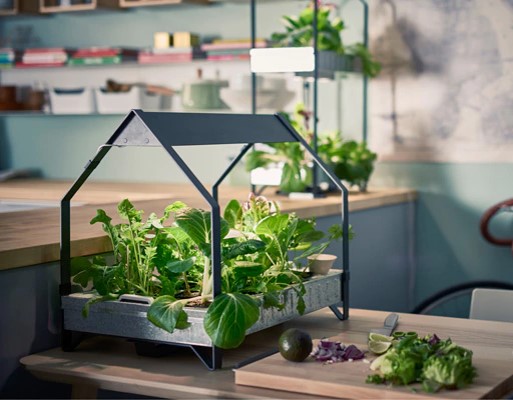
The furniture retailer Ikea has introduced a product to grow indoor veg garden.

It is based on hydroponic technology where we don’t use soil to grow plants.

Water is filled with nutrients to make it viable to cultivate plants.

Hydroponic is easy to grow plant technology system that require light, nutrient and water. These three components are easily adjustable and hydroponic devices helps to fine tune the growing condition. These fine adjustments make process less water intensive. Plants will be viable year around.

indoorgarden-healthylife-werindia

Many vegetables that are widely available in the market can be grown using hydroponic technique indoor. The absorbent foam plugs in Ikea system enable seeds to spout and then proceed to keep seeds moist without over-watering them. After seed germination the entire foam plug need to be transferred to small pots with pumice stones which retains lot of water.

veggardenkitchen-healthylife-werindia

Pots later can be transferred to a growing tray that is equipped with solar lamp for the growth of plants with necessary illumination. The system is successful because plants can be grown in room without sunlight!

hydroponic-healthylife-werindia.jpg

The design that Ikea came up with is KRYDDA/VAXER SERIES – a design born with collaboration with agriculture scientists in Sweden with targeting audiences who live in smaller apartments and don’t have garden or who cannot afford to buy fresh produce during long winter months. It is ideal for minimal place.

Images: Google, IKEA

Reference: https://www.dezeen.com


Author: HealthyLife | Posted on: April 16, 2018
« »
« »

Recommended for you

Is Coke good for human body?

Proof That Coke Does Not Belong In The Human Body

Coke is the most valuable brand in history, and “Coca-Cola” is the world’s second-most recognized word after “hello.” However, the beverage itself is an absolute poison to the human metabolism. Coke is very close to the acidity level of battery acid and, consequently, it can clean surfaces equivalent to and often better than many toxic household cleaners.

It’s cheaper and easier to buy Coke in some third world countries than it is to access clean water. Coke uses “public relations propaganda” to convince consumers and entire nations that it is an “environmental company” when really it is linked to pollution, water shortages, and disease.

People who consume soft drinks such as Coke have a 48% increase in heart attack and stroke risk, compared to people who did not drink the sodas at all or did not drink them every day.

A study published in the journal Respirology reveals that soft drink consumption is also associated with lung and breathing disorders including asthma and chronic obstructive pulmonary disease (COPD).

The carbonation in Coke causes calcium loss in the bones through a 3-stage process:

1. The carbonation irritates the stomach.

2. The stomach “cures” the irritation the only way it knows how. It adds the only antacid at its disposal: calcium. It gets this from the blood.

3. The blood, now low on calcium, replenishes its supply from the bones. If it did not do this, muscular and brain function would be severely impaired.

But, the story doesn’t end there. Another problem with most Coke is it also contain phosphoric acid (not the same as the carbonation, which is carbon dioxide mixed with the water). Phosphoric acid also causes a draw-down on the body’s store of calcium.

So Coke softens your bones (actually, makes them weak and brittle) in 3 ways:

1. Carbonation reduces the calcium in the bones.

2. Phosphoric acid reduces the calcium in the bones.

3. The beverage replaces a calcium-containing alternative, such as milk or water. Milk and water are not excellent calcium sources, but they are sources.

Esophageal cancer was very rare two generations ago — now, it’s common. The basic mechanism works as follows:

1. Mechanical damage to cells is a huge risk factor for cancer. It’s why asbestos particles, for example, cause lung cancer.

2. All soft drinks cause acid reflux (stomach acid rising up past the esophageal valve). This is more pronounced when the body is horizontal (as in sleeping), but the sheer volume of Coke and soft drinks consumed in the USA means the acid reflux is well past the danger point. Any time you ingest a gassy drink, you are going to get belching–and acid into the esophagus. How much is too much? The research doesn’t say where the limit is–it only shows that most of us are far, far, far past it.

3. Stomach acid dissolves tissue — that’s its purpose. The stomach lining does not extend into the esophagus, so the lower esophagus gets damaged by acid far more frequently in soft drink users than in non-soft drink users. This results in a radical increase in cell mutations, along with a far higher level of free radicals.

Coke acts as an acidic cleaner. The amount of acid in soda is enough to wear away at the enamel of your teeth, making them more susceptible to decay. In tests done on the acidity levels of soda, certain ones were found to have pH levels as low as 2.5. To put that into perspective, consider that battery acid has a pH of 1 and pure water has a pH of 7.

.

Read More: http://www.trueactivist.com/


Author: HealthyLife | Posted on: April 5, 2018
« »
« »

Recommended for you

Five best and safe turmeric facial mask recipes

Five best and safe turmeric facial mask recipes

Attending a social event and no time for facial?

Then try one of these five best and safe turmeric facial mask recipes for all occasions.

These are easy to prepare turmeric facial masks especially for girls to get a glowing and clear skin. Ingredients mentioned in the recipes should be readily available at your home.

All the ingredients mentioned in the recipes are good for skin.

1. Turmeric and curd: Mix a half table spoon turmeric with one table spoon curd (yogurt). Apply on face. Avoid eye contact. Leave it for 10 to 15 minutes. Wash face using slightly warm water and soap.

2. Turmeric, curd and honey: Mix half table spoon turmeric, one tea spoon honey with one table spoon curd. Apply on face and hands. Leave it for 10 to 15 minutes. Wash using warm water and soap.

3. Turmeric, honey and glycerin: Mix half table spoon turmeric, 1 tsp honey and 1 tsp glycerin. Apply on face. Avoid eye contact. Leave it for 10 to 15 minutes. Wash using cold or warm water followed by a wash in soap.

4. Turmeric, honey and lemon juice: Mix half table spoon turmeric with 1 tsp honey and 1 tsp lemon juice. Apply on face. Leave it for 10 to 15 minutes. Wash using warm or cold water followed by a wash using soap.

5. Turmeric, castor or coconut oil or sesame oil: Mix equal part of turmeric powder with any of the mentioned oils. Leave for ½ hour. Wash face using warm water followed by soap.

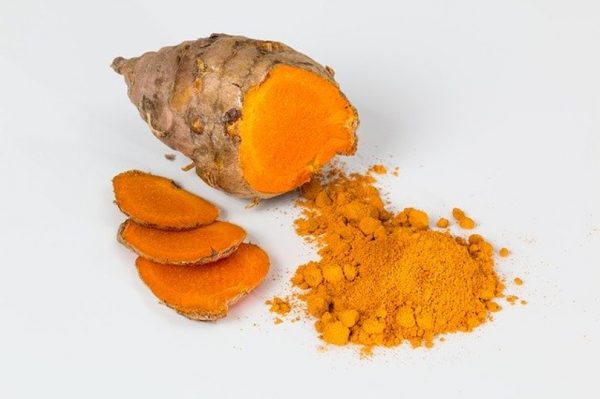
For best results use organic turmeric powder. Treating your skin with any of these facial mask recipes once a week, will give you glowing and beautiful skin. Turmeric being a miracle herb provides best treatment for the skin and helps to cure many skin conditions.

Image credit: Image by Steve Buissinne from Pixabay  (free for commercial use)


Author: HealthyLife | Posted on: April 4, 2018
« »
« »

Recommended for you