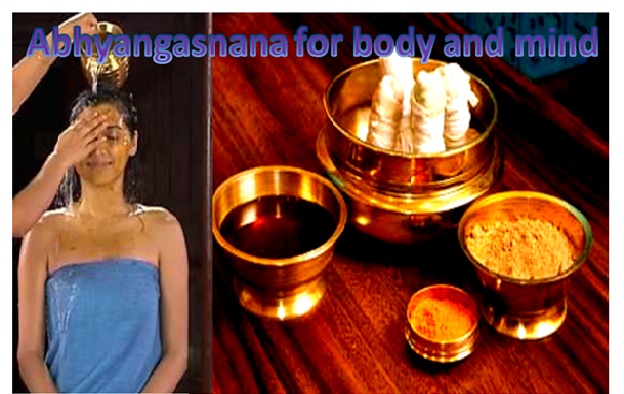
All posts by HealthyLife

HealthyLife is a part of www.WeRIndia.com, an all India – centric website (https://healthylife.werindia.com) and is solely owned and operated by WeRIndia.com. It is a Indian nutritional portal providing educational articles.This nutritional port was launched on February 5th, 2015.
HOT SUMMER ? - Try this cooling juice

HOT SUMMER ? – Try this cooling juice

This year temperature around the globe is high and often we feel body heat that makes us dehydrated. If are exposed to too much Sun and do not drink enough liquid it is problem for the body. Body muscle will struggle to cope up with heat and develops inflammation and pain. People who are already suffering from chronic pain will feel much more pain and becomes miserable. Instead of drinking soda and other caffeinated drinks here is a simple juice that has simple and most wonderful herbs. Turmeric – an anti- inflammatory herb, cucumber – a natural coolant, lemon – helps to overcome tiredness, lettuce that contain moisture, fiber, bit of natural sugar, carrot that contains beta carotenoid helps in keeping system clean -when we put all these together in a juicer we get a summer juice which helps to overcome body heat by keeping system cool. Try this wonderful juice & feel better.

Ingredients (for 2 people)
• 2 inch piece of fresh turmeric (or 2 tsp of turmeric powder)
• 1/2 lettuce (romaine or regular)
• 3 Carrots
• 1 Cucumber
• 1medium size Lemon – peeled

Instructions
• Wash all vegetables in running tap water to remove any dust or other foreign particles. Cut into small pieces (as needed to blend)
• Juice vegetables in the order of – turmeric, lettuce, carrots, lemon, and cucumber
• One can retain the fiber or stain the juice.
• Stir the mixture before serving

Recipe: WerIndia.com


Author: HealthyLife | Posted on: May 6, 2016
« »
« »

Recommended for you

The last of the Ringling Bros. elephants are now officially retired

The last of the Ringling Bros. elephants are now officially retired

The Ringling Bros. Elephants Just Performed Their Last Show And Are Now Retired !!

By Brianna Acuesta ( http://www.trueactivist.com/)

The last 11 elephants working as part of the Ringling Bros. Circus performed their last show on Sunday and are set to retire to the elephant conservation center owned by the circus in Florida.

Ringling Bros. announced that they would be moving up the date of the elephants’ retirement to May this year rather than the promised 2018 retirement. Even though they agreed to completely stop using elephants in their shows, the long wait still outraged animal rights advocates who said that the large creatures should be able to stop working immediately.

On Sunday at the Providence, Rhode Island show, the elephants performed for the last time and many felt sad but elated during their final bow. The show was streamed live on Facebook so that anyone could watch their very last act.

Six Asian elephants danced, balanced on each others’ backs, pretended to nap and sat on their hind legs as Ringmaster Johnathan Lee Iverson told the crowd, “This is a very emotional time for us.”

Elephants have been used in the circus in America for over 200 years and for more than 100 years in “The Greatest Show on Earth.”

Though their final exit might seem sad for many who will never see them perform again, it’s a huge victory for the elephants and advocates for animal rights. The elephants live sad lives on the road with the circus, spending most of their time in chains and boxcars for days at a time. Starting at less than 2 years old, the elephants are torn from their mothers and “broken” so that they learn to fear the bullhooks, ropes, and electric pods and become obedient. For the remainder of their lives as performers, they are constantly beat and hit for the slightest mistakes they make.

There is no regulation for animals performing in circuses and the only evidence of this abuse has been caught by undercover investigations by animal welfare groups like PETA.

A total of 40 Asian elephants will now be residing at the Ringling Bros. and Barnum & Bailey Center for Elephant Conservation, but the fate of other animals in their circus is still unknown. When the group had announced that they would retire their elephants, they added that they “will continue to feature other extraordinary animal performers, including tigers, lions, horses, dogs and camels.”

At the last show on Sunday, protestors still met around the venue to protest the use of ALL animals in the circus because of the abuse and stress they endure.

Read More: http://www.trueactivist.com/the-ringling-bros-elephants-just-performed-their-last-show-and-are-now-retired/


Author: HealthyLife | Posted on: May 3, 2016
« »
« »

Recommended for you

Tofu Curry

Tofu Curry

Recipe by: Mamatha Anil (http://bhakshyabhojana.blogspot.com/)

Tofu is soy-based product very rich in protein. Tofu is made by coagulating soymilk and is a favorite dish of many vegans. Tofu originated in Han dynasty China about 2000 years ago and is a regular ingredient of Asian dishes. Tofu is an alternate to paneer (Indian cheese) and replaces chicken in non-vegetarian food.  Tofu has a low calorie count and relatively large amounts of protein. It is high in iron, and depending on the coagulants used in manufacturing it can have higher calcium or magnesium content.

Tofu masala is an Indian curry which is spicy and delicious. Try this recipe and let us know what you think?

Ingredients:

  1. Tofu (Soy Paneer) 350g
  2. Tomato 2
  3. Green chillies 2
  4. Onion medium size 1
  5. Ginger garlic paste 1 tsp (fresh)
  6. Red Chilli powder 1 tsp
  7. Coriander powder 2 tsp
  8. Turmeric powder ¼ tsp
  9. Garam masala powder ¼ tsp
  10. Chopped coriander leaves 1/2 cup
  11. Clove 2
  12. Salt
  13. Oil
  14. Butter/Ghee

Method:

  1. Pressure cook the tomatoes. Remove the skin and seeds. Make puree out of cooked tomatoes along with green chillies. Keep aside.
  2. Cut the tofu into cubes. Heat butter/ghee in a pan and shallow fry the tofu till it becomes golden on both the side. Keep aside.
  3. Heat oil – add 2 cloves, chopped onions and ginger garlic paste. Fry them till they turn slightly golden in color.
  4. Add green chilli –tomato puree. Add red chilli powder, coriander powder, garam masala powder, turmeric powder and salt. Mix well. Add ¼ cup water and let it cook in medium heat for 5 minutes.
  5. Finally add fried tofu, mix well and cover the lid. Cook for another 3-5 minutes in low heat. Garnish with chopped coriander leaves.
  6. Tofu masala is ready to serve. It goes well with roti, chapati and rice.

Author: HealthyLife | Posted on: May 2, 2016
« »
« »

Recommended for you

Laughing Yoga

Laughing yoga: Benefits

In today’s world, people want to be healthy, they want to be happy, but instead they are stressed out, depressed, getting less sleep, more negative thoughts and feeling isolated.  What is the solution for this stress and to move away from negative thoughts? One easy solution is “smile”.  As we, all know “laughter is the best medicine”.

Laughing yoga is in practice from many years.  In the early 90’s an Indian medical Dr. Madan Kataria worked as a registrar in a local hospital in Mumbai, also used to write papers for medical journals. In his scholarly work, he became interested in the growing body of scientific evidence showing that laughter is extremely beneficial to mental and physical health. He decided that more laughter helps to improve health and cope with the stress of modern living and started a quest to find ways that laughter can be prescribed to patients and people who needed it. In March 1995, while writing an article ‘Laughter – The Best Medicine’ for a health journal, he discovered many modern scientific studies, which described in depth, the many proven benefits of Laughter on the Human mind and body. In particular, Dr. Kataria was impressed by Norman Cousins’ book Anatomy of an Illness and the research work by Dr. Lee Berk.

The idea of laughing yoga came to Dr. Kataria’s mind when he was reading articles about laughing. His interest grew when he found out that Dr. William F. Fry, a professor of Psychology at Stanford University, California, was the first scientist to suggest in 1964 that laughter was a suitable field of study and the first to apply for public funding. He became the first self-proclaimed Gelotologist (an expert in the science of laughter, from the Greek root gelos, to laugh.) Similarly, Dr. Kataria was inspired by work and readings of Norman Cousins (1915-1990). Dr Cousins was an editor of the Saturday Review and was receiver of hundreds of awards including the UN Peace Medal. He raised a lot of public awareness about the healing power of laughter and positive emotions following his miraculous 1964 “laughter recovery” from a fatal illness, ankylosing spondylitis (a rare form of degenerative arthritis). He claimed that 10 minutes of belly rippling laughter would give him two hours of pain-free sleep, where previously nothing, not even morphine, could help him. His story baffled the scientific community and inspired a number of research projects. His 1979 book Anatomy of an Illness is a classic.

Oprah Winfrey
Oprah Winfrey

Profoundly inspired and being a man of action, Dr. Kataria immediately decided to field-test the impact of laughter on him and others. Starting with just five people, at 7 am on March 13, 1995, at a public park in his neighborhood in Mumbai, India; he launched the first ‘Laughter Club’. These five founding members laughed together in the park that day to the amusement of bystanders; and within few days this small group quickly grew to more than 50 participants. While they ran out of jokes Dr. Kataria came up with another idea. Dr. Kataria understood that our body can not differentiate between pretend and genuine laughter. Both produced the same ‘Happy Chemistry’. The next morning he explained this to the group, and asked them to try to act out laughter with him, for one minute. Amid skepticism, they agreed to try…. The results were amazing. For some, the make believe laughter quickly turned into real laughter – this was contagious and in no time others followed. Soon the group was laughing like never before. The hearty laughter that followed persisted for almost ten minutes. This breakthrough was the birth of Laughter Yoga.

Dr. Kataria also found similarities between Pranayama and laughter yoga. He incorporated elements from this ancient form of Yoga into Laughter Yoga, including the deep breathing exercises now used between laughter exercises, to deepen the impact.

In September 2011, academics from Oxford University published research demonstrating that continuous laughter significantly increases people’s pain threshold, by as much as 10%.

How to perform laughing yoga?

Laughter Yoga includes four things:  clapping in rhythm to ‘ho-ho-ha-ha-ha’, breathing and stretching, child-like play and laughter exercises.  Laughter comes from the body not the mind.  When we take part in a laughter workshop we get a release of endorphins, giving us a “feel good” factor; the whole body relaxes and stress and tension is reduced.  We also get an aerobic exercise.  Laughter tones our muscles and improves our respiration – and our immune system is boosted which helps us to resist disease. Laughing in a group is a good exercise.

Benefit:

Scientific studies show that laughter has positive effects on the heart, blood vessels, stress hormones, mental health and family relationships. These health benefits of laughter all contribute to smoother overall functioning, which in turn speeds injury healing and helps manage chronic pain.

  • Helps to improve Learning Skills
  • Builds confidence and enhances beauty of mind and body
  • Helps in anger Management
  • Helps in keeping up Relationships
  • Complete Wellness: relaxes mind and body
  • Fitness/ Slimming: controls hormones that act on our body
  • Regulates Breathing
  • Best Cardio Workout
  • Releases mental stress
  • Aids Digestion
  • Development of sense Of humor
  • Alleviates Fear And Anxiety
  • Checks Diabetes and arthritis
  • Body feels energetic and younger

Image Credits: Laughteryoga.org

Further reading:

  1. http://www.skillsyouneed.com/ps/therapeutic-laughter
  2. www.laughteryoga.com

Author: HealthyLife | Posted on:
« »
« »

Recommended for you

GRANDMA'S HAIR CARE TIPS

Grandma’s Hair Care Tips

Grandmothers always will have best traditional tips for various (common) conditions. Because they have more experience and whatever they do for younger generations, they do with lots of affection and care. Here is a collection of grandmothers’ tips for beautiful hair.

1) Coconut oil : Apply coconut oil and massage scalp for few minutes. And, leave it for few hours. The longer you leave coconut oil on your hair, the more effective it will be. Coconut oil nourishes the scalp and helps to get shiny and good hair. It is effective in removing dandruff. It acts as a good conditioner because of smaller medium-chain fatty acids. Coconut oil penetrates hair more deeply and faster than other conditioners.

2) Curry leaf oil: a) In a glass bottle take one or two ounces of sesame oil and add few curry leaves. Keep it under bright sunlight to steep. Once the oil changes to green color, then oil is ready to use for scalp massage.
b) Warm sesame oil and add few curry leaves. Again, warm the oil with curry leaves again for 2-3 minutes. Oil turns green and ready to use for hair.

3) Centella oil : Grind few centella leaves to a paste and add it to coconut or sesame oil. Warm the oil for a minute to two. Use this oil on hair to get rid of dandruff and split hair problem.

4) Brahmi oil : Bacopa monnieri is brahmi plant and highly medicinal. Leaves of brahmi oil steeped in sesame oil is good for hair growth. Apply this oil an hour or two before washing hair. Or one can warm the oil under low flame and add brahmi leaves -bring it to a boil and take it out of flame. Transfer content to a bottle and use it whenever you need.

5) Sesame oil : Sesame oil application to hair and scalp is very good. Sesame oil helps in controlling premature graying of hair, helps in hair growth and protects from hot sun. Sesame oil is enriched with Vitamin E, B complex, and minerals such as magnesium, calcium, phosphorus and protein that strengthen the hair from the roots and give deep nourishment.

6) Olive oil : a) Massaging extra virgin oil on hair and scalp helps to re-grow the hair. It helps to prevent hair loss. Just pour a small amount in your palms and massage it into your scalp, gently, and continue down to the end of your strands. For approximately a half hour after your hair is coated, keep your hair wrapped with a damp towel or shower cap in order to give it time to soak into the scalp and hair itself.

b) Add few drops of lemon juice to olive oil, mix well and apply to hair. This will act as a natural conditioner.

7) Shikakai (Acacia concinna) has been in use for many centuries in Indian houses. Sun dried fruits are powdered and can be stored for many years. Paste of the powder can be applied to hair and wash. This will act as shampoo. Care should be taken powder should not enter eyes.

8) Hibiscus : Both hibiscus flower and leaves are good for hair. Collect the leaves and petals of hibiscus. Make sure you collect a lot because you have to crush it and get the juice out of it. Or you can boil both leaves and flowers for few minutes. Take the juice and apply it to hair and wash.

9) Fenugreek application: Soak 3 to 4 tsp of fenugreek overnight and grind it in the morning. Apply on hair for an hour and wash. This gives shining to hair and controls hair fall.

10) Henna and Indian gooseberry (amla) for hair: Mix henna powder ( one can use fresh leaves paste) and amla in equal quantity. Add little hair oil of your choice. Keep it for couple of hours. Apply it to hair and leave it for 2 hours. Wash hair. This controls graying of hair and helps hair to regain its strength and beauty. Care should be taken – do not add more henna powder as it turns hair brown or reddish.

11)Mixture of oil for massaging: Massaging scalp stimulates blood circulation and gives shine and strength to the hair root. Use a mixture of coconut oil, almond oil and olive oil in equal quantities. To get better results heat this oil mixture a little bit before applying to your scalp.

General care tips:

• Do not brush wet hair. Wet hairs are more vulnerable for damages.
• Use sun light to dry hair and cut down on blow dryers, hot curlers, straight iron and other hair styling products.
• Apply oil previous day of washing hair.
• Use wide tooth comb to detangle the hair.
• Do not use chemical based shampoo or conditioner when your hair is going through dryness and damages.
• Strengthen your hair with right food: Include foods that contain Biotin in your diet. Biotin is present in brown rice, lentils, sunflower seeds, walnuts, soybeans, walnuts. Include protein, omega 3 fatty acids, vitamin C and selenium in your diet. Leafy vegetables that serve folic acid is good for hair health.

Tips collection: www.werindia.com

Image credit: Photo by Yoann Boyer on Unsplash


Author: HealthyLife | Posted on: April 27, 2016
« »
« »

Recommended for you

RAW MANGO RICE (MANGO CHITRANNA)

Raw Mango Rice (Mango Chitranna)

Indian traditional food- mango chitranna or mango rice is a South Indian delicacy. During mango season and Hindu new year celebrations people prepare raw mango rice as a main dish to serve for lunch.There are varieties of recipes for mango rice. Some require more than a dozen ingredients. Here one of the simplest mango recipe which is easy to prepare and delicious too !

Mango rice – Chitranna recipe (Quantity for 6 people)

1. 2 cups cooked long rice (preferable) or sona massuri rice
2. 1 large raw mango, grated
3. 1/2 teaspoon split urad dal
4. 1/2 teaspoon chana dal
5. 1 tbs peanuts
6. 1/2 teaspoon mustard seeds
7. 2 green chillies, slit
8. 2 sprigs curry leaves
9. 1/4 teaspoon turmeric
10. 1/2 teaspoon asafetida
11. Salt to taste

Method:

• Prepare rice with little less water, so that rice should be like pulav rice or separated and too sofrt

• Spread rice in a plate and allow it to cool.

• In a wide mouth pan add oil and get ready for seasoning. Add mustard seeds, chana dal, split urad dal, peanuts and mix gently. Once the urad daal turns slightly brown and gives good aroma lower the flame and curry leaves, turmeric, green chillies and asafetida. Fry for few seconds.

• Now add the grated raw mango, salt and mix till the grated raw mango softens and wilts a little bit.

• To this above mix add cooked rice and mix all the content together for few minutes under low heat. Make sure to combine all the contents properly. Taste and add salt according to your needs.

• Garnish with fresh coriander leaves, (grated fresh coconut is an option) and serve delicious mango rice with raita, lemon pickle (no garlic pickle), pappad or potato (not spicy) chips !

Recipe: www.werindia.com


Author: HealthyLife | Posted on:
« »
« »

Recommended for you

Wild Mango Gojju

Wild Mango Gojju

Recipe by: Mamatha Anil (http://bhakshyabhojana.blogspot.com/)

Mango season it is! And, there are so many varieties of dishes one can prepare using mangoes. Gojju is Karnataka’s special dish where one can savor vegetables like mango, pineapple, bitter gourd, cucumber in a gravy. Mango gojju or sasive – with a mixture of sweet, sour and spicy taste.  Best is to use small ripened raw mangoes. If it is not available one can use other mango varieties are available in your regions. Remember to pick up small sized mangoes.

Mango gojju recipe (serves 3 people)

Ingredients:

  • Ripe wild mangoes 4-5
  • Grated coconut ¼ cup
  • Green chillies 4-5
  • Dry red chilles 2
  • Jaggery 3-4 tsp
  • Turmeric powder ¼ tsp
  • Mustard 1 tsp
  • Curry leaf 1 strand
  • Asafoetida pinch
  • Oil 1 tsp
  • Water
  • Salt

Method:

1. Wash and peel the skin of mango. Take the mangoes in a vessel and slightly mash it. [Do not discard the seed ]

2. Combine grated coconut, mustard, green chillies, water, turmeric powder and salt in a blender and make paste out of it.

3. Pour the paste into the vessel with mashed mangoes, add some water and jaggery, Cook till one boil.

4. Seasoning: Heat oil in a pan, add mustard when it splutter add asafoetida, curry leaves. Pour this into the cooked mango gujju/sasive.

5. This recipe goes well with rice.


Author: HealthyLife | Posted on: April 22, 2016
« »
« »

Recommended for you

Cat Pose (Marjaryasana)

Cat Pose (Marjaryasana)

(Are you looking to strengthen and tone abdominal muscles? Here is a yoga pose that helps not only strengthen the abdominal muscle but also massages and improves digestion. This is marjasana or marjaryasana or cat pose. It helps to relax the mind).

Pose Type: Backbend, Core

Sanskrit: Marjaryasana (mar-jar-ee-AHS-anna) marjari = cat (marjasana)

BENEFITS

  • Strengthens the arms, wrists, and shoulders
  • Relieves tension in the thoracic, cervical, and lumbar spine; warming up the back for practice
  • Gently massages the abdominal organs and improves digestion
  • Strengthens and tones the abdominal muscles
  • Increases spinal flexibility 

CONTRAINDICATIONS

  • Wrist injury
  • Neck injury (align head with torso)
  • Back injury or recent surgery

HOW TO –

1. Come onto your hands and knees in a tabletop position.

2. Align your shoulders directly above your elbows and wrists; and set your hips directly above your knees. Spread your fingers, gaze between your palms, and bring your head to a neutral position.

3. Inhale and lengthen your spine, creating a flat back that is parallel to the floor.

4. As you exhale, press through the ground and engage the abdominals. Round your back toward the sky, tuck the tailbone, and release your head toward the floor.

5. Hold for one breath and return to a neutral, tabletop position.

6. This posture is generally practiced along with Bitilasana (Cow pose). Inhale into Cow pose and exhale into Cat pose for a balanced stretch.

MODIFY OR REPLACE

Alternatives:

  • Chair Cat pose

Modifications:

  • Tuck the toes under the feet, or rest the tops of your feet on the ground for comfort.
  • If your knees are sensitive, place a blanket on the floor beneath them.

VARIATIONS

Make this a balancing pose by extending the opposite arm and leg as you inhale. As you exhale, curl the extended elbow and knee to the chest. Come back to center and switch sides. Try to synchronize movement with breath.

WATCH OUT FOR

  • Knees coming out of line with the hips
  • Wrists coming out of line with the shoulders
  • Straining the neck

This article is republished with permission from https://beyogi.com/poses


Author: HealthyLife | Posted on: April 20, 2016
« »
« »

Recommended for you