
All posts by HealthyLife

HealthyLife is a part of www.WeRIndia.com, an all India – centric website (https://healthylife.werindia.com) and is solely owned and operated by WeRIndia.com. It is a Indian nutritional portal providing educational articles.This nutritional port was launched on February 5th, 2015.
Spiced honey citrus salad

Spiced honey citrus salad

Honey and citrus fruit combination always works miracle. Honey is known for its antimicrobial property and it is a natural preservative. It is incorporated in our traditional medicines because of unique properties.

Citrus fruits are immune boosters as they contain Vitamin C and helps in cold, cough and brings back energy to body. Citrus fruits are good for digestive system and helps in removing toxins from body.

Together honey and citrus fruits bring all good qualities. Add little spice to honey to make it tastier and sprinkle it on citrus fruits with pomegranate seeds – you will have delicious spiced honey citrus salad and will get all health benefits.

Ingredients:

  1. Black peppercorns – 1 tsp
  2. Crushed red pepper – ¼ tsp
  3. Cloves – 4
  4. Cinnamon stick – 3 inches
  5. Bay leaf -1
  6. Medium size oranges – 3
  7. Mandarin oranges – 3
  8. Ruby red grapefruits – 2
  9. Limes – 2
  10. Pomegranate seeds – From 1 fruit
  11. Honey – ½ cup

Toppings: Extra virgin olive oil, fresh mint leaves and sea salt

 Method:

  • Add black peppercorns, crushed red pepper, cloves, bay leaf, honey and cinnamon. On medium heat bring the contents to boil. Remove it from heat and allow it to stand for half an hour.
  • Peel oranges, grapefruit, lime and remove bitter white pith. Cut each fruit into think round shapes.
  • Arrange cut fruits in a platter and sprinkle pomegranate seeds.
  • Now, pour desired amount of spiced honey mixture on fruit platter through a fine wire mesh strainer. Discard solids form the liquid.
  • Top with olive oil, few mint leaves and sea salt.

Recipe reference: Wegman’s


Author: HealthyLife | Posted on: January 29, 2018
« »
« »

Recommended for you

Paneer burji recipe

Paneer burji recipe

Paneer burji is a good lunch item for kids and office going people who would like to carry lunch from home.  And, it is a replacement for egg. One will get enough protein and it is tasty too. It goes well with roti, chapati, bread, puri etc.

Paneer is Indian style cheese. It can be prepared at home easily. It is soft cheese and as popular as regular cheese.

Many states from North India use paneer as one of the main ingredient in their dishes. It supplies lot of protein as it is prepared from milk. It does not melt easily and holds its texture.

It can be marinated and grilled easily. It is somewhat like tofu. It mixes well with vegetables and spices.

100 gram of paneer provides about 18.3 grams of protein. It also contains carbohydrate and fat.

Try paneer burji for a change in place of egg burji.

Ingredients:

  1. Paneer – 1 cup
  2. Fresh peas – ½ cup
  3. Bell pepper (green or red) – 1 cup
  4. Tomato – ½ cup
  5. Coriander and jeera powder – 1.5 tsp
  6. Green chilli – 2 or 3
  7. Salt as required
  8. Cumin – 1 tsp
  9. Turmeric powder – ½ tsp
  10. Cilantro/coriander chopped – 2 Tbsp
  11. Oil or ghee – 1 Tbsp

Method:

  1. On medium heat, heat oil and add cumin seeds, green chillies. Fry for few seconds and add turmeric powder, cumin and coriander powder (jeera, dhania powder). Continue frying a minute.
  2. Meanwhile, get ready with paneer – either crumble paneer or grate it and keep it aside.
  3. Now add fresh peas and fry. Cover the lid so that, fresh peas becomes tender.
  4. Now add cut tomatoes and fry for two minutes.
  5. Add cut capsicum (bell pepper) and mix well. Let it cook for couple of more minutes.
  6. Switch heat to low heat and add crumbled paneer and mix well.
  7. Add salt and stir the mix. Add chopped cilantro leaves and mix well.
  8. Turn off heat and serve hot paneer burji with puri or chapati or bread.

Recipe: www.werindia.com


Author: HealthyLife | Posted on: January 22, 2018
« »
« »

Recommended for you

Extended Hand to Big Toe Pose

Extended Hand to Big Toe Pose

Extended hand to big toe pose is advanced yoga pose. Yogis who practice yoga daily will be able to perform this pose bit more easily compared to middle or beginner class students.

Practicing hip opener poses and strengthening both arms and legs helps in getting into this pose.

With these concentration on balancing of body with mind is important too. While performing this pose if there is not enough concentration yogi will lose balance and collapse with pose -rounding upper body, knee injury and hurting hands is possible. Slowly, steadily get into pose helps.

The benefit of performing this pose helps in strengthening the feet, ankles, hips, legs, arms and core. It helps to stabilize ankles and gives strength to both legs.

Mind gains confidence, develops focus and balances emotions and feelings. – Healthylife.werindia.com

 Utthita Hasta Padangustasana / Extended Hand to Big Toe Pose

LEVEL :Advanced

Anatomy : Glutes, Hamstrings, Hips, Legs, Spine, Thighs

Pose Type: Balance, Standing

Sanskrit :Utthita Hasta Padangustasana (oo-tee-tah ha-sta pad-an-goosh-TAHS-anah)

utthita = extended hasta = hand pada = foot angusta = big toe

BENEFITS

  • Lengthens the hamstring of the extended leg
  • Stabilizes the hip joint of the standing leg
  • Improves single leg balance and stability
  • Strengthens the entire spine
  • Strengthens the ankle, knee, hip, and shoulder joints, as well as supportive structures of the joints in the standing leg

CONTRAINDICATIONS

  • Hip pathologies
  • Balance deficits
  • Low back pathologies (avoid rounding)
  • Ankle, knee, hip, or shoulder injuries

HOW TO

  1. Start in Tadasana (Mountain pose) with feet hip-width apart, and begin to feel your weight shift over to your right foot. Engage the thigh of the standing leg to support the knee.
  2. Set your gaze. Inhale and lift your left knee, reaching for the big toe only if you are able to extend the spine back to neutral.
  3. Exhale, press the heel forward, and begin to extend the knee.
  4. Inhale and allow your spine to lengthen, lifting out of your torso and drawing your shoulder blades down your back.
  5. Exhale, draw the abdominals in, and lift the chest.
  6. Hold this pose for up to 5-10 slow breaths.
  7. To exit, inhale and release the toe, but keep the leg extended. Then exhale, and release your arm and extended leg to Tadasana. Repeat on the opposite side.

MODIFY OR REPLACE

  • Feel free to practice near a wall for support; keep the knee bent as you raise it.
  • Place hands at the hips for support or utilize a strap around the foot for extension.
  • Stay in standing and extend the heel in front without reaching for the toes.
  • Lift leg with a bent knee and reach for the front of the knee.

SEQUENCING TIPS

Before:

  •  Garudasana (Eagle pose)
  • Trikonasana (Triangle pose)
  • Vrkasana (Tree pose)
  • Parsvottonasana (Pyramid pose)

After:

  • Virabhadrasana III (Warrior III)
  • Tadasana (Mountain pose)

TEACHING CUES

  • Keep the upper and lower spine lifted through the torso.
  • Keep hips stacked equally side by side, and slightly engage the inner thighs.
  • Draw your knee toward your chest, reach for the inside of the big toe, and extend through the heel.
  • On each inhale, feel your chest lift and spine lengthen. On each exhale, press the heel forward.

VARIATIONS

  • Utthita Hasta Padangustasana B, C, D

WATCH OUT FOR

  • Rounding of the spine
  • Tight hamstrings: keep the knees bent
  • Pain/strain in the knees, shoulders, or lower back

Article and image published here is with permission from www.beyogi.com


Author: HealthyLife | Posted on:
« »
« »

Recommended for you

These 22 kitchen hacks make life easy

These 22 kitchen hacks make life easy

To our previous kitchen hacks list Grandma is adding 22 more tips to make life interesting and easy at kitchen

  1. Place old newspaper at the bottom of garbage bin to absorb liquids from waste food
  2. Put pancake mix in a ketchup bottle for no mess
  3. Wrap a wet paper towel around your beverage and put in the freezer. Within 15 minutes beverage it will be almost completely ice cold
  4. To serve ketchup, chutney, mustard, pickles in party use muffin tin
  5. Use a hanging shoe rack to store cleaning supplies in bathroom or laundry
  6. To remove stem from strawberries, insert a straw in the center.
  7. Butter stick is too hard? Grate it to soften it
  8. Use a rubber band to loosen a tight jar lid. Place rubber band (or a rubber piece) around lid and turn it easily.
  9. To cut cheese or other soft foods use unused, unscented dental floss!
  10. Put ice cream containers in zip lock bags and store in freezer. When you open next time, it will be soft and easy to scoop
  11. Sprinkle lemon juice on a sliced avocado to retain green color
  12. To stop banana over ripening, wrap cling film around the stalk
  13. To chop green leaves, use a pizza cutter, cutting will be fast and easy
  14. Place an apple with potatoes to keep them from sprouting
  15. To slice cherry tomatoes or other cherry fruits in one slice, gently press them between two plates and pass the knife between plates
  16. On back of cabinet door hang measuring cups in order and mark measuring units for easy cooking
  17. Keep nut or seed flours in freezer to retain freshness for longtime.
  18. To keep herbs fresh trim their stems and place in water inside a container. Tent the leaves with Ziploc bag and keep in refrigerator
  19. Use kitchen tong to squeeze more juice from lemon
  20. To avoid mess while pouring small seeds, sugar, tea powder into bottles cut envelop in cone shape and insert in bottle mouth and pour the item.
  21. Leafy vegetables – wash and dry thoroughly and wrap in paper towel and keep inside Ziploc bag and store in refrigerator to maintain freshness.
  22. If honey is getting thick and crystallized, keep the whole bottle of honey in a pan containing warm water. Honey will come back to its natural state.

Reference and image credit: Vimeo.com, https://www.pexels.com/search/kitchen%20hacks/ , Pixabay.com, walmart.com, community.tucson.com


Author: HealthyLife | Posted on: January 16, 2018
« »
« »

Recommended for you

Plastic fragments found in Denmark chocolate

Plastic fragments found in Denmark chocolate

Now a days plastic monster is everywhere. It is not just on side of roads or ocean or drinking water, sea salt or rice, but now it is inside everybody’s favorite chocolates too!

Recently, the Food Safety and Standards Authority of India (FSSAI) has sent out an alert regarding the presence of plastic fragments exported from Denmark to various countries.

FSSAI reacted to the alert notice received from Rapid Alert System for Food and Feed (RASFF) issued by the European Commission.

According to the warning There is a risk that the product in question contains small pieces of plastic which may cause choking in children. Thus, it is imperative to start follow up action, including recall”.

The FSSAI sent the alert note on January 5, a day after receiving an alert through the International Food Safety Authorities Network. Global network of food safety authorities is managed by WHO and Food and Agricultural Organization.

Including India following countries who imported these chocolates from Denmark have been informed about eh implicated chocolate product with follow-up actions- Belarus, Belgium, Canada, Finland, France, Germany, Hungary, Norway, Qatar, Slovakia, Sweden, Turkey and the United Kingdom.

The product category under which the chocolates are sold is cocoa and cocoa preparations, coffee and tea.

The following four product descriptions have been identified which are imported:

  • Anthon Berg Marcipanbrod Whiskey 40g (marzipan bread with whiskey)
  • Anthon Berg Marcipanbrod Cognac 40g (marzipan bread with cognac)
  • Anthon Berg Sweet Moments Marzipan Bar Mini 165g
  • Anthon Berg Sweet Moments Marzipan Collection 400g

Professor Arpita Mukharjee from ICRIER said that “these kinds of chocolates which have been detected with small pieces of plastics are not usually what small children consume. However, irrespective of age, it is a health and food safety issue. The EC has done the right thing by alerting the importing countries. In fact, European Union has more stringent standards for food than India and they are the same for the domestic market, export and import.

On RASFF portal public can see the alert regarding the risk revel of imported product into EU member states if the product does not meet the EU food safety standards. As per Prof Arpita, India does not have similar system reporting imported products.  The IFSS standards for milk and some of the milk products are still below the Codex standards. Importing sub standard or low quality products can pose health issues  (Codex General has developed several standard guidelines that should be implemented for the milk and milk products).

Considering the demand for dairy products in India, it is time to implement proper and strict standards to bring best quality milk products. Upgrading domestic standards and monitoring the imports at the ports of entry will help to avoid such big issues in future.

In response FSSAI officers from Kolkata stated that “AS of now, no sample or consignment has been found in the region. But following the instruction from FSSAI, continuing watching on the same is being carried out!”

This information was also made available by the apex regulator to consumers and stakeholders. It will help in any inadvertent consumption of the chocolate (product in question), so that consumers (public) can avoid buying it through online sales or by other means.

References:


Author: HealthyLife | Posted on:
« »
« »

Recommended for you

Reasons to cook at home

Grandma’s reasons to cook food at home

With busy and crowded schedules families are finding it difficult to find quality time together.  Commute to job in many major cities is each way two hours due to traffic.

Evening as it becomes late and hardly there is any time to cook, parents take easy path of getting food from outside restaurant or canteens.

Moreover, there is no time for buying groceries, vegetables and no time to cook. This gives good business to restaurants. But what effect it has on family life?

Entire family is all the time apart and depends on unhealthy food for survival. This can damage mental and physical health of children too.

Here are grandma’s reasons to wake up and consider squeezing some time to cook at home even if it is simple food.

  1. Save health: Home cooked food or meals are perfect for all who wants to remain healthy. When we prepare meals at home from the scratch, we know what ingredients goes in. If children or adults are allergic to some foods, we can avoid adding those ingredients unlike the outside food. We even can take control on adding salt or sugar. One need not to cook varieties of food on week days. Try something simple and quick. There are many quick recipes available that can be prepared within half an hour. Another option is, free up two hours during week end and cook for 3 days. Store food in refrigerator.
  2. Save money: This could be one the most practical reasons for many families. Takeaway and restaurant foods cost more than weekly grocery bill for many. Shop for grocery during week end – have a list for the week. Nonperishable items can be bought once in a month or so. This saves time and money. Plan for the meal for an entire week. Stick the list on refrigerator. This way you know what ingredients you need and there won’t be any waste or will be less wastage.
  3. Family spends quality time together: Family who likes to spend time together will find it attractive and it also helps young people at home to interact with each other and with parents. If you make it a point to sit together to eat dinner as often as possible, you can catch up on various activities and understand what is happening in each other’s life – school or work life. Suggest or act on to make dining table a smartphone free zone. Encourage all family members to smile and have a healthy meal.
  4. It increases knowledge of food: Food is much more than an “item that fills stomach”. What goes in the meal influences human body which can be positive or negative. Cooking our own meal helps us to understand our body’s requirements in terms of nutrients and energy. It boosts the morale and keeps us creative.
  5. Savor the food: Preparing our own meals will lead to newfound appreciation for the items that we consume. Mindless munching and eating junk food can only harm our physical health leading to weight gain. But, by cooking the food at home, we will be conscious about what we eat and how much to consume.
  6. Food safety: Food borne illness mostly happens when we eat outside food. You never know how long the food would be sitting out or when for example, flies might be sitting on the food. We all know what insects can do to the food. Cooking food at home gives peace of mind and we are assured that food is stored properly. Apart from storage, we will be conscious to keep cooking area and utensils clean.

Listen to grandma’s advice for better and happy life !

www.healthylife.werindia.com

Image credit: Photo by Alyson McPhee on Unsplash


Author: HealthyLife | Posted on:
« »
« »

Recommended for you

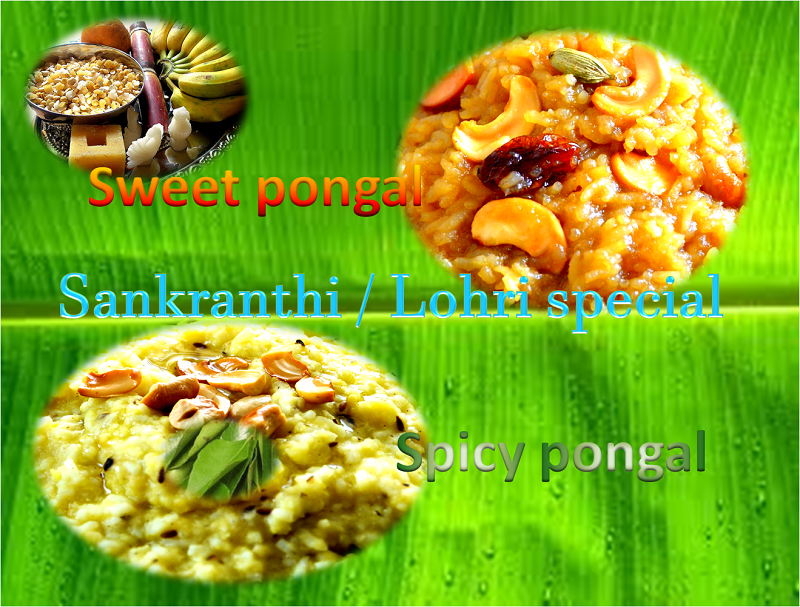
Sweet and Spicy Pongal Recipes

Sweet and Spicy Pongal

The festival of Sankranthi and Lohri are approaching. Both these two festivals marks the harvesting season and change in the path of Sun. Makara Sankranti marks the transition of the sun into the zodiacal sign of Makara (Capricorn) on its celestial path. With this days are going to be longer, more bright and activities will increase. To mark the harvesting season people of India traditionally prepares two dishes made of rice and moong dal. These are spicy (khara) pongal and sweet pongal.  Both these are  delicious with high carbohydrates and lot of protein.

Sweet pongal recipe:

Jaggery is the traditional sweetener of sweet pongal and gives good fragrance and taste for the sweet dish.

Ingredients

  1. Sona masuri rice – 1/2 cup
  2. Split moong dal – 1/4 cup
  3. Jaggery – 1 cup grated
  4. Cashew nuts -2 tbsp
  5. Raisins -2-3 tbsp
  6. Cardamom powder -1/4 tsp powder
  7. Ghee (clarified butter) -1/2 cup

Preparation:

1. Roast moong dal in a pan by adding 1/4 tsp of ghee. In a pressure cooker, cook both rice and moong dal by adding 2 and 1/2 cup water.

2. Once the mix is cooked, using a spoon mash the mix and keep aside.

3. In a pan heat 1/4 cup of water and add jaggery, Once jaggery dissolves remove the impurities settled at bottom by filtering jaggery water.

4. Again boil jaggery water by adding 1/2 tsp of clarified butter. Let the jaggery syrup become little thick *.

5. Now add mashed rice and dal to jaggery syrup followed by cardamom powder.

6. In tsp of ghee fry cashew and add to above mix.

7. Allow raisins to puff up in the ghee and add it at the end to pongal.

8. Add rest of the ghee and cook for few minutes under low flame.

9. Serve hot as a sweet dish for Lohri or Sankranthi festival.

*Not sticky consistency

 Spicy (khara) pongal

Ingredients

  1. Spicy (khara ) Pongal
  2. Sona masuri rice -1 cup
  3. Split moong dal – 1/2 cup
  4. Turmeric powder -1/4 tsp
  5. salt
  6. Cumin seeds -1 tsp jeera/cumin seeds
  7. Curry leaves – few
  8. Black pepper – coarse powder -1 tsp whole black pepper, coarsely crushed fresh
  9. Asafetida or hing -1/4 tsp hing/asafoetida (I use SSP brand powdered asafoetida)
  10. Desiccated coconut – 1/4 cup (optional)
  11. Broken cashew – Few
  12. Ginger – 1 inch (cut into small pieces or grate)
  13. Ghee (clarified butter) -1/4 cup

 Preparation:

1. Dry roast the yellow lentils in a thick bottomed pan over medium heat until fragrant and golden brown.

2. Pressure cook both rice and roasted dal using 4.5 cups of water, salt and chopped ginger. Leave it for 6-7 whistles.

3. Remove the mix and mash it well and keep aside.

4. In a pan on medium flame, add ghee and add cumin seeds, pepper powder, curry leaves, turmeric.

5. Transfer the cooked rice and dal mix into the seasoning and mix well.

6. Now add salt and hing and mix well again.

7. In a small pan heat a little ghee and fry cashew and transfer it to pongal.

8. Serve hot and spicy pongal with coconut chutney!

Reference: www.werindia.com


Author: HealthyLife | Posted on: January 12, 2018
« »
« »

Recommended for you

Turmeric and Honey Mix

Turmeric and Honey Mix

Turmeric is one of the strongest antibiotic herb that is described in Indian ancient texts and medicines. Alone or in combination with other ingredients it is one of the most preferred herb for various conditions. Indian kitchens use turmeric on daily basis. Without Turmeric, there is no curry. Similarly, the use of turmeric to keep skin healthy is traditional aspect of Indian culture.  Turmeric often combined with honey, milk, lemon juice, black pepper, curd or lemon zest to use for various conditions. The blend of turmeric with honey and /or any of other ingredients has powerful healing capacity. Turmeric has anti-inflammatory property and controls allergies. It is a immune booster.

Raw honey also has anti-inflammatory property and reduces chronic pain. It is a powerhouse of all good characters and just like turmeric can be used externally as well as can be used as food. Whether it is cold, burns, wounds, skin problems, cough – for various condition raw honey can be included in the home remedies.

Now imagine what happens when these two ingredients combined? You will have a wonderful mixture in your hand that can be used for various conditions and it is strongest antibiotic mix !.

If you consume orally,

  • Turmeric powder – 1 Tbs
  • Pinch of black pepper – it optimizes turmeric absorption by body
  • Raw honey – 100 grams
  • Lemon zest – 1 tsp

Mix turmeric powder and black pepper. Add this to honey and keep stirring using a spoon until you get a smooth semi-solid liquid. Add lemon zest and continue mixing. Transfer the mixture to an air tight container and store. Avoid storing in fridge as it might give an odd odor. Use it within few days of preparation for following conditions.

  • For flu, asthma, bronchitis and lung problems: Take half tsp three times a day before food.
  • For dry cough and cold –Evening a tsp before going to bed with warm milk (or roast turmeric root and prepare powder – mix with honey, black pepper powder and lemon zest and take a tsp with warm water twice a day).
  • For energy and immune system booster: Take one Tbsp of the mix daily morning or at night
  • For body inflammation: Daily morning a tsp of the mix with warm water or half glass milk

For external application: Don’t add black pepper. Instead of lemon zest, add lemon juice and mix three ingredients and use it same day.

For skin: Apply this on face, hands, legs – leave it for 20 minutes and wash using warm water. Repeat 2 to 3 times a week or alternate days.

Remember: If adulterated and not well processed turmeric is used, it might give problem. People who have gall bladder problem should consult doctor before consuming turmeric. Honey is not recommended for children below age 1.

Grandma’s remedies: www.healthylife.werindia.com


Author: HealthyLife | Posted on: January 9, 2018
« »
« »

Recommended for you