All posts by HealthyLife

HealthyLife is a part of www.WeRIndia.com, an all India – centric website (https://healthylife.werindia.com) and is solely owned and operated by WeRIndia.com. It is a Indian nutritional portal providing educational articles.This nutritional port was launched on February 5th, 2015.
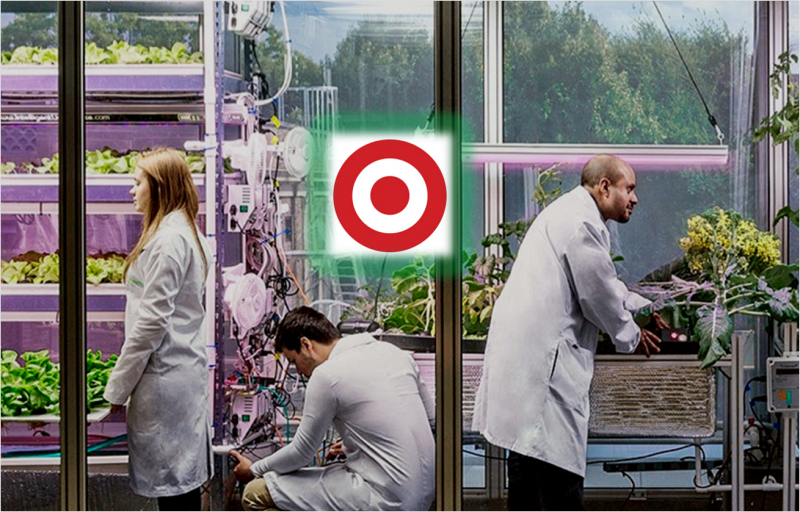
Target Stores To Launch In-Store Vertical Farms

Target Stores To Launch In-Store Vertical Farms To Grow Their Own Crops

Target would be one of the first retail stores to grow their produce on-site!

Indoor farming is quickly becoming a growing trend because of consumers’ mistrust in GMOs, the yearning to buy as local as possible, and a decline in usable land. There are a variety of indoor farming options available, including incubators that grow plants for households and vertical hydroponic systems that can churn out huge amounts of produce in warehouses.

The latter is likely what would be used at Target, who has announced that they will be testing out a vertical farming system starting in Spring 2017.  The trials will be done at different locations across the country that have not yet been announced, but the store plans on starting out with leafy greens and possibly building their way up to potatoes, beets, and zucchini.

Target collaborated with IDEO and the MIT Media Lab and created Food + Future coLab, a group that is “pushing the edges of technology, business, and design to create new, impactful ventures” that change the way we know and create food. They have been researching in-store micro-farming for over a year and their findings will finally be put to the test next year. Greg Shewmaker, one of the entrepreneurs at the coLab, said,

“Because it’s MIT, they have access to some of these seed banks around the world, so we’re playing with ancient varietals of different things, like tomatoes that haven’t been grown in over a century, different kinds of peppers, things like that, just to see if it’s possible.”

The benefits of indoor farming are immense, but among the most common reasons people turn to it are to become more well-acquainted with their fresh food by knowing its source and to avoid GMOs and pesticides. With indoor farms, pesticides are often not used at all because pests are not present and the crops can be grown organically without GMOs. Buying local produce is also better because it’s fresher when purchased and significantly reduces cost of travel from the site where it was grown. The yield is also much higher than crops grown outdoors and the plants are not vulnerable to changes in weather, allowing the crops to grow year-round.

While Target could really benefit from transitioning to this type of growing, so could consumers. Plants that were grown indoor tend to be healthier for people, and that’s truly what people have been leaning towards as they become disillusioned with Big Ag companies.

Read More: http://www.trueactivist.com/target-stores-to-launch-in-store-vertical-farms-to-grow-their-own-crops/


Author: HealthyLife | Posted on: October 31, 2016
« »
« »

Recommended for you

The date stamped on packaged cereals is the _______________.

  • pack date
  • best-if-used-by date
  • expiration date

The answer is: Best-if-used-by date


Author: HealthyLife | Posted on: October 30, 2016
« »
« »

Recommended for you

Diwali Sweets

Diwali Sweets Recipes

Deepavali double dhamaka for our readers!!  Celebrate your Deepavali /Diwali with two easy to make sweets.  A traditional sweet from India -Badam burfi and for chocolate lovers truffles made out of ginger and chocolates.

Badam or almonds have best nutritional value and very rich in protein. This homemade  badam burfi reduces body pain and inflammation !  It is good for hair growth and for skin too.

And, dark chocolate is aphrodisiac and is good for heart!  Mixed with ginger taste ginger – chocolate truffles is one delicious treat for everybody.

Here are recipes of both sweets!!

Ginger- Chocolate Truffles

Ingredients:

  1. Double cream =200 ml
  2. Chocolates (dark) = 300 gms
  3. Ginger powder = 1 Tbs
  4. Cinnamon powder = 1 Tbs
  5. Ginger biscuits = 150 grams

Preparation:

  1. On low to medium heat, boil the double cream
  2. When cream comes to a boil, add chocolates
  3. As the chocolate melts, stir and mix both ingredients well
  4. Once both ingredients mixed well add ginger and cinnamon powders and mix well
  5. Remove from heat and chill in refrigerator for 3 hours
  6. Take ginger biscuits and using a food processor powder the biscuits
  7. Now take out the chocolate-cream mix and prepare golf ball sizes small balls and dip in the powdered biscuits. Powder has to stick to the balls evenly.
  8. Now Gingerbread Chocolate Truffles are ready to eat.

 Badam (Almond) Burfi

Ingredients:

  1. 1/2 cup of almonds (badam)
  2. 1/4 cup milk
  3. Sugar
  4. 2 to 3 Tbs of clarified butter or ghee
  5. Little cardamom powder
  6. Saffron – little

 Preparation:

  1. Take cup of almonds and soak in hot water for about 30 minutes
  2. After 30 minutes take out the almonds and remove the skin
  3. Transfer almonds to a mixer container and add milk. Grind and prepare fine badam paste
  4. Remove badam paste and measure the amount
  5. Take same amount of sugar in a cup*

* Amount of sugar and almond paste should be 1:1

  1. Place a pan on a medium heat and transfer the almond paste and sugar into it. Mix well both ingredients
  2. Now add 2 Tbs of clarified butter or ghee and little cardamom
  3. Keep stiring the mixture till the burfi mixture becomes thick and roll into a mass and separates from the pan
  4. Transfer this hot mix to a previously greased pan
  5. Using a spoon spread the mix on the pan with a thickness of about 1/ 2 inch
  6. Allow it to cool for little time. When burfi is still warm, cut into diamond shape. Sprinkle saffron on top of the cut pieces
  7. Share and serve badam burfi with family and friends.

Source: www.werindia.com


Author: HealthyLife | Posted on: October 27, 2016
« »
« »

Recommended for you

Refrigerator

Where and how foods are stored in refrigerators?

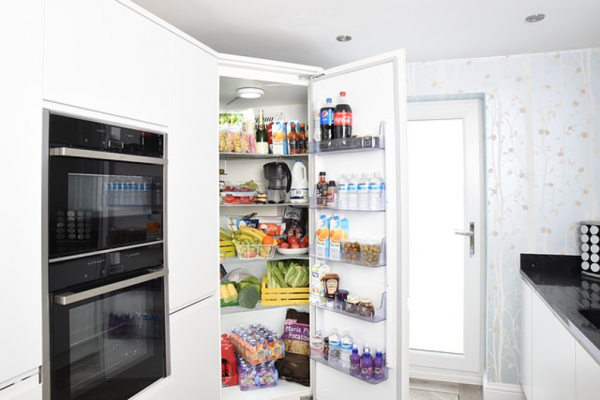
Refrigerators are designed to keep and store the foods in certain way so that the freshness remains and foods will not spoil for many days. From fresh vegetables to leftovers depending on the temperature and humidity of the refrigerator – foods should be separated and stored.

Remember to keep your refrigerator below 40°F. At this temperature, bacteria that spoil food grow slowly. Buy a refrigerator thermometer at the supermarket and keep it in your fridge.

Where different foods are stored in refrigerators?

In upper Shelves: The top shelves have the most consistent temperature in the fridge. Use them for dairy, drinks, ready-to-eat foods, and leftovers.

  • Refrigerate all dairy products promptly and preferable in the back of the refrigerator because it’s colder. Cover well so they don’t pick up other odors. Leave cottage cheese, yogurt, sour cream, milk, and cream in the containers they came in.
  • Fresh leafy vegetables and herbs like cilantro, parsley, bread varieties also can go on the top shelf.
  • Close leftover containers and store them – Refrigerate even if leftovers are still warm – to ensure they do not enter the danger zone, between 40°F and 140°F. Carefully date leftovers and keep them at the front of the refrigerator where you can see them and use them right away. Discard all leftovers after four days.

Lower Shelves: Keep packages of raw meat, poultry and fish in a separate plastic bag, a bowl or a pan on the lowest refrigerator shelf. This keeps juices from dripping onto other foods, and the lowest shelf is usually the coldest.

Door: The warmest area of the fridge, room-temperature air gushes in every time the door is opened. Put your least perishable items on the door, with most of the space taken up by condiments. The refrigerator door is the warmest part of the fridge, so only condiments should go there. Do not store eggs or milk in the door, as they should be placed in a colder part of the refrigerator. Even though some fridges have door compartments for butter and eggs, it is best to keep them elsewhere. Some juices can be kept here. For example orange juice is pasteurized and the citric acid naturally prevents bacteria growth.

Drawers: Keep fruits and vegetables separate and store like with like: apples with apples, carrots with carrots. Refrigerate cut or peeled produce, or cooked fruit or vegetables, even if purchased pre-cut or peeled.

Most humidity drawers are adjustable with a few clicks between low and high. Put things that tend to rot in a drawer with a low-humidity setting. This includes fruits and veggies that emit an ethylene gas, like apples and pears. Things that wilt go in the high-humidity drawer. This will be leafy greens, like arugula, spinach, and herbs. How to prepare vegetables for storage? See few examples below:

Artichokes: Sprinkle with a little water and store in a plastic bag.

  • Asparagus: Wrap stalk ends in damp paper towel and place in a plastic bag.
  • Beets: Cut off the green tops and refrigerate them separately.
  • Bell Peppers: Store in a plastic bag.
  • Broccoli: Store in an open plastic bag in the crisper.
  • Brussels Sprouts: Keep in a plastic bag.
  • Cabbage: Store in a perforated plastic bag in the crisper.
  • Carrots: Remove the green tops; keep in plastic bag in the crisper.
  • Cauliflower: Store in an open plastic bag in the crisper.
  • Celery: Store in a plastic bag in the crisper.
  • Corn: Keep the husks on until ready to cook.
  • Cucumber: Store in a plastic bag.
  • Eggplant: Keep in a plastic bag.
  • Green Beans: Store in a tightly closed plastic bag or airtight container.
  • Green Onions: Store in a plastic bag.
  • Kale: Keep in a perforated plastic bag in the crisper.
  • Leeks: Store in loosely closed plastic bag.
  • Lettuce: Keep in loosely closed plastic bag in the crisper.
  • Mushrooms: Store in a paper bag – plastic makes them spoil faster.
  • Peas: Store in a perforated plastic bag.
  • Radish: Remove the green tops before storing in a plastic bag.
  • Spinach: Store in a perforated plastic bag in the crisper.
  • Turnips: Keep in a plastic bag.
  • Zucchini: Store in a plastic bag.

Do not store garlic, onion, shallot, sweet potato, potato, arabi in refrigerator.

Freezer: Always keep your freezer at zero degrees (0°) or below to maintain the quality of frozen foods. Most foods will maintain good quality longer if the freezer temperature is -10 to -20°F. At temperatures between 0 and 32°F, food deteriorates more rapidly.

If stored properly in airtight containers, most whole grain flours and meals will keep for 1 to 3 months on a cool, dry pantry shelf or 2 to 6 months in the freezer.

In freezer you can also  store – pizza dough – base, ready to eat packs – daal, rice items, left over pancakes, waffles, cakes, firm cheese, ice cream, candy etc.

Some suggestions:

  1. Store all foods wrapped or in covered containers.
  2. Leave food in its store wrapping unless the package is torn.
  3. Do not keep perishable foods at room temperature for longer than two hours.
  4. Avoid overloading your refrigerator because cold air needs room to circulate.
  5. Once a week, clean out the refrigerator. Discard any questionable foods rather than risk food poisoning.
  6. Use fresh meat, poultry and fish within a couple of days.
  7. Remove any moldy items and clean the containers.
  8. To clean refrigerator, remove all stuffs out. Take a bowl heat a cup of water and add baking soda and few drops of lemon juice in it. Store this inside refrigerator for few minutes to take out all odor. And, prepare another bowl of same mix and using paper towel clean inside the fridge.
  9. Maintain your refrigerator between 34°F and 40°F. Refrigerator thermometers are available to help monitor the temperature inside the appliance. See more on thermometers.
  10. Label frozen food items, maintain a rotation system and use the items with the oldest dates first.
  11. Allow proper air circulation in the freezer.
  12. Buy proper containers and storage bags that are reusable to store foods.

For more information about how long one can  store various types of foods in refrigerator please visit: http://www.fda.gov/downloads/Food/FoodborneIllnessContaminants/UCM109315.pdf


Image credit: Image by difisher from Pixabay  (Free for commercial use)


Author: HealthyLife | Posted on: October 25, 2016
« »
« »

Recommended for you

Paniyaram

Prepare Paniyaram with left over batter!

Sometimes we will be worried what to do with left over fermented dosa or idli batter. Do you know you can make a special dish using these left over batters? This delicious and tasty dish is called “eriappa” “appam” or  “paniyaram”  in South Indian states. This is also a traditional dish that one can prepare and serve for breakfast, lunch, snack or dinner!! To prepare this what you need is a special type of tava with round holes. These utensils called “appam patra”. It is available in iron or non stick materials. Try this yummy dish for children.

Try this Grandma’s masala paniyaram with left over batter.

Ingredients:

For the masala batter

  1. 500 ml Idli or thick dosa batter
  2. 3 tablespoon Sago/Sabudana/
  3. ½ teaspoon mustard seeds
  4. Pinch asafetida
  5. One big onion, chopped fine
  6. 4 green chillies, chopped fine
  7. ¾ cup fresh shredded coconut
  8. 1 string curry leaves (chopped)
  9. 1/4 cup chopped cilantro or coriander leaves &
  10. ½ cup Vegetable Oil for cooking

Preparation:

1. Soak Sago in ½ cup of water for half an hour. Grind to a paste. Set aside.

2. Prepare seasoning with mustard seeds and little asafetida.

3. Add this seasoning to batter along with onion, chillies, coconut, curry leaves, coriander leaves.

4. Add sago paste and mix well.

5. Heat the “appam patra” or “paniyaram patra” until hot. Add ¾ teaspoon of vegetable oil into each mold.

6. Drop the above masala batter to fill the mold. Cook for a minute on one side. Then turn and cook on the other side. Turn again if necessary to make sure the paniyaram is evenly cooked on both sides and its nicely golden in color.

7. The paniyaram is ready if it has become crispy and golden on both sides.

8. Serve paniyaram with coconut chutney and sambar.

You can also pack 4- 6 paniyaram for lunch for kids or even take it to office for lunch. It tastes very good especially with coconut chutney! 


Author: HealthyLife | Posted on:
« »
« »

Recommended for you