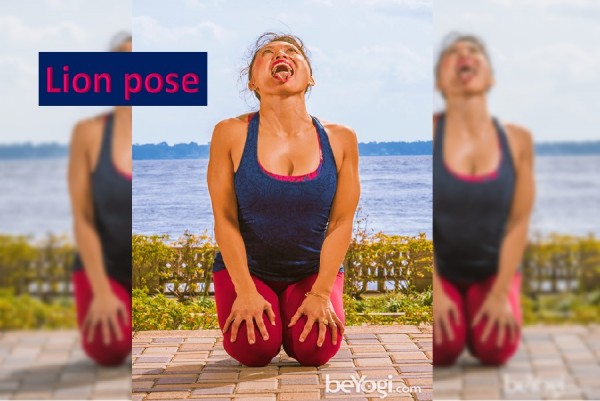
The Lion pose benefits
Lion pose is simple, beginner’s pose in Yoga. This simple pose provides many health benefits – it relieves tension from system, improves blood circulation to face, keeps vocal cord and chest healthy. It stimulates platysma, prevents sore throat, asthma and other respiratory ailments. Overall it strengthens lungs, throat, chest by stimulating tonsils and boosting immune system. When we breath out and roar like lion it takes out all the stress and brings back calmness to system. One can try this pose anywhere, anytime – www.healthylife.werindia.com
LEVEL :Beginner
Anatomy :Face, Jaw, Neck, Tongue
Pose Type :Seated
Sanskrit: Simhasana (sim-HAHS-anna) simha = lion
BENEFITS:
- Relieves tension in the front of the neck (tongue, jaw)
- Promotes good posture and confidence
- Tones the platysma
- Stretches the tongue
- May treat bad breath
- Activates three of the bandhas (Mula, Jalandhara, Uddiyana)
CONTRAINDICATIONS
HOW TO
- Kneel on the floor. Lift your sitting bones and cross your legs at the ankles, so your feet face the sides of your mat. Then sit back onto the top heel.
- Place the left hand on the left knee and right hand on the right knee. Extend your arms, spread your fingers out wide, and press your palms firmly against the knees.
- Inhale through your nose and open your mouth wide. Stretch your tongue out and down, toward your chin, as far as you can.
- With your tongue sticking out, exhale and let out a powerful, audible breath. The exhalation should mimic a roar, making the “ha” sound.
- Set your gaze upward between your eyebrows or to the tip of your nose.
- Stay in Lion pose for 30 seconds, roaring up to three times. Then switch the crossing of your legs and repeat on the other side.
MODIFY OR REPLACE
Alternatives:
Kapalabhati Pranayama (Breath of Fire)
Modifications:
- Sit back on both of the heels instead of crossing at the ankles.
- Place a blanket between your sitting bones and your heels for comfort.
- If sitting onto the heels is difficult, sit on a block in Virasana (Hero pose).
SEQUENCING TIPS
Before:
- Sukhasana (Easy pose)
- Balasana (Child’s pose)
After:
- Paschimottanasana (Seated Forward Bend)
- Salabhasana (Locust pose)
TEACHING CUES
- Make sure your back is long; sit up tall.
- Spread your shoulder blades across your back.
- Keep your arms extended and engaged.
- Exhale in one powerful breath with the tongue sticking out and mouth open as much as possible.
- Make the “ha” sound as you exhale; roar.
VARIATIONS
- Sit in Padmasana (Lotus pose). Extend the arms to the floor in front of you. Come forward to stand on your knees, and then move your pelvis toward the floor. Follow steps 5-6 above.
WATCH OUT FOR
- Student is in a comfortable seated position
This article and image published here with prior permission from www.beyogi.com
Author: HealthyLife | Posted on: January 19, 2019
« Designing a simple life for better living Shashankaasana Rabbit pose »


Write a comment