


 Fusion
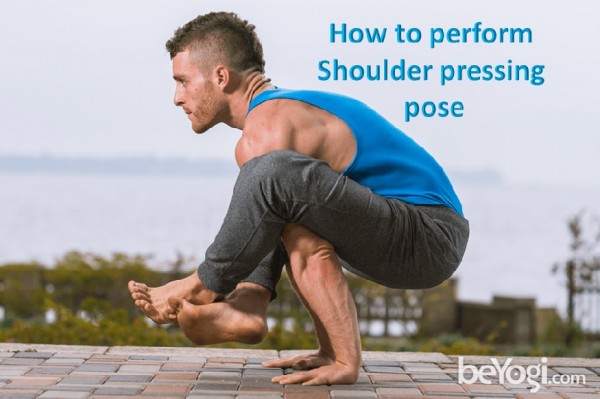
Shoulder pressing pose
To boost confidence and to keep focus on our tasks Bhujapidasana or shoulder pressing pose helps.
It helps to strengthen core and tones belly, strengthens shoulder and arms.
This is an advanced yoga pose that also helps to open pelvis and hips.
Another benefit is this pose stimulates abdominal organs and reduces constipation.
Getting into this pose takes lots of practice.
Initially put pillows around so that if you loose balance you won’t hurt yourself – Healthylife
LEVEL : Advanced
Anatomy: Abs, Arms, Heart, Shoulders, Spine
Pose Type: Arm Balance
Sanskrit: Bhujapidasana (boo-JAH-pee-DAHS-anah) bhuja = arm, shoulder pida = pressure
BENEFITS
- Stretches the shoulders, triceps, and hip flexors
- Tones and stimulates abdominals organs
- Strengthens the upper spine musculature
- Lengthens the spinal musculature and gluteals
- Opens the pelvis and hips
- Boosts confidence
CONTRAINDICATIONS
- Spine pathologies
- Hip pathologies
- Wrist, elbow, or shoulder injury
HOW TO
- Start in Malasana (Garland pose). Bring the torso forward through the inner thighs.
- Raise your hips until they are parallel with the floor. Draw your upper arms and shoulders as far under your knees as possible. Then place your hands at the outer edges of your feet, fingers facing forward.
- Inhale and draw the torso forward, bringing weight into the palms of your hands. Press through the floor.
- Exhale and squeeze your thighs into your upper arms. Wrap your left ankle over your right ankle in front of you.
- Take your gaze toward your toes.
- Hold Shoulder-Pressing pose for 30 seconds or up to a minute.
- To exit, slowly release the ankles with an inhalation. Bend the elbow to settle the feet on the mat. Repeat the pose with the right ankle over the left.
MODIFY OR REPLACE
Alternatives:
- Tittibhasana (Firefly pose)
Modifications:
- Place blocks under the palms for support.
SEQUENCING TIPS
Before:
- Bakasana (Crow pose)
- Malasana (Garland pose)
- Prasarita Padottanasana (Wide-Angle Forward Bend)
- Eka Pada Bakasana II (One-Legged Crane 2)
After:
- Malasana
- Adho Mukha Svanasana (Downward-Facing Dog)
TEACHING CUES
- Keep the abdominals firm and press through the shoulders for support.
- Squeeze the thighs together and press through the palms to extend the arms. Keep the shoulders engaged.
- Be cautious of the low spine and hips. Do not strain.
- Bind the feet together by wrapping one ankle on top of the other.
VARIATIONS
- Tittibhasana (Firefly pose)
- Eka Pada Bakasana II (One-Legged Crane Pose 2)
WATCH OUT FOR
- Straining the wrists, shoulders, elbows, or low back
- Hands lifting, instead of firmly rooting into the floor
This article and image published with permission from https://beyogi.com/
Author: HealthyLife | Posted on: April 20, 2018
« Previous Article
Next Article »
« Trataka yogic gazing for Eye health Powerful yoga pose Chaturanga Dandasana »
« Trataka yogic gazing for Eye health Powerful yoga pose Chaturanga Dandasana »


Write a comment