


 Fusion
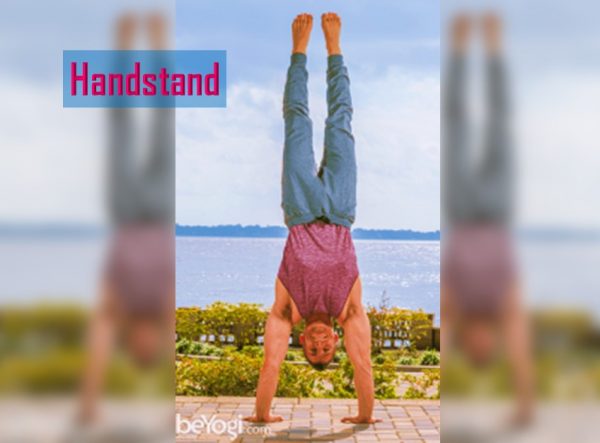
Handstand
To increase the blood flow to brain and to promote reversed blood flow that energizes mental status one must practice handstand. This is intermediate pose that needs supervision while practicing. Handstand boosts confidence and increases focusing capacity of mind. The benefit of doing handstand to body is- stretching abdomen, strengthening arms, shoulder and wrists. It is important to continue breathing while performing this pose and to stabilize spine movement. Stretching wrists throughout handstand inversion helps body to protect head in case we fall while doing the pose. It not only increases blood flow to brain, also activates neck, aids in tissue regeneration. – Healthylife.com
LEVEL : Intermediate
Anatomy : Arms, Shoulders, Wrists
Pose Type :Balance, Inversion
Sanskrit : Adho Mukha Vrksasana (ahh-doh moo-khah VRK-shahs-anna)
adho = downward mukha = face vrksha = tree
BENEFITS
- Strengthens the shoulders, arms, and wrists
- Expands the chest
- Improves balance
- Calms the mind
- Relieves stress
CONTRAINDICATIONS
- Pregnancy
- High blood pressure
- Carpal tunnel syndrome
- Neck, shoulder, or back injury
- Headache
- Heart conditions
- Glaucoma
- Ear infections
HOW TO
- Begin in Downward-Facing Dog with your hands shoulder-distance apart. Spread your fingers wide and press your palms firmly into the ground.
- Walk your feet in, toward your head, until your hips are aligned over your shoulders.
- Fix your gaze at one spot in between your hands. Draw your shoulders upward, toward your tailbone.
- Lift your right leg to the sky and flex your foot. Press firmly through the heel to keep this leg active. Then bend your left knee slightly, press into the ball of the left foot, and push off the floor to lift your left leg toward the sky.
- Continue pushing down through the palms and extending through the heels of your feet. Engage your abdominals to keep your hips aligned over your shoulders.
- Balance in the pose for several breaths. Exhale and lower the legs one at a time. When practicing Handstand, alternate which leg you lift first.
MODIFY OR REPLACE
Alternatives:
- Legs Up the Wall (Viparita Karani)
- Dolphin Plank pose (Makara Adho Mukha Svanasana)
Modifications:
Practice against an open wall for support. Place your hands about 4 inches away from the wall. Then follow the steps above, but kick the legs up toward the wall, until you can balance with legs extended straight up.
Practice hopping into a handstand before you try to balance in the pose. Extend your right leg toward the sky. Bend your left knee and, pressing through the ball of the left foot, kick the left leg off the floor, springing both legs toward the sky.
Wrap a yoga strap around your upper arms to keep them strong and engaged.
SEQUENCING TIPS
Before:
- Mountain pose (Tadasana)
- Dolphin Plank pose (Makara Adho Mukha Svanasana)
- Forearm Stand (Pincha Mayurasana)
After:
- Child’s Pose (Balasana)
TEACHING CUES
- Rotate your upper arms outward.
- Keep your gaze focused at one point to balance.
- Draw your belly toward your spine.
- Reach your tailbone toward your heels.
- Keep your shoulder blades lifted as you come out of the pose.
VARIATIONS
- Lift your head and face the floor.
Advanced practitioners, who are very comfortable in Handstand, may move into Scorpion Handstand (Vrschikasana).
WATCH OUT FOR
- Overarching the spine
- Shoulders collapsing
This article and image published here with prior permission from beyogi.com
Author: HealthyLife | Posted on: March 27, 2023
« Previous Article
Next Article »
« Butt sculpting poses Achieve Balance By Practicing Revolved Triangle Pose – Parvittra Trikonasana »
« Butt sculpting poses Achieve Balance By Practicing Revolved Triangle Pose – Parvittra Trikonasana »


Write a comment