All posts by HealthyLife

HealthyLife is a part of www.WeRIndia.com, an all India – centric website (https://healthylife.werindia.com) and is solely owned and operated by WeRIndia.com. It is a Indian nutritional portal providing educational articles.This nutritional port was launched on February 5th, 2015.
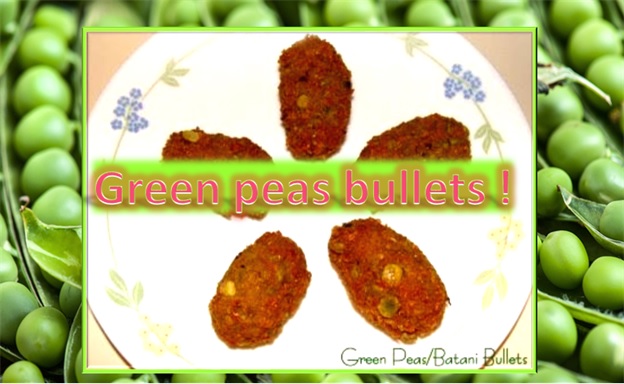
Green Peas Bullets

Green Peas Bullets!

Green peas belong to bean family and are packed with several good nutrients. It is good source of vitamin K, protein, manganese, dietary fiber, vitamin B1, copper, vitamin C, phosphorus, and folate. Green peas became popular in 16th century and Canada ranks high in green peas production. Some of the health benefits of green peas for humans:

  • Good for weight management
  • Mexican research says that peas consumption can prevent stomach cancer
  • Anti-aging, strong immune system and high energy:
  • Peas can prevent wrinkles, alzheimer’s, arthritis, bronchitis, osteoporosis and candida – the presence of pisumsaponins and pisomosides helps in regulating inflammation.
  • Good source to reduce blood sugar
  • Good source of protein and helps in reducing risk of heart conditions
  • Good for bones and it also reduces bad cholesterol

Green peas bullet is a simple and slightly spicy delicacy one can have as a snack item with coffee and tea (Healthylife.werindia.com)

Try this simple recipe –

Ingredients:

  1. Green peas 1 cup
  2. Green chillies 3-4
  3. Curry leaves 1-2 strands
  4. Ginger 1” piece
  5. Salt
  6. Oil for deep frying

Method:

  1. Soak the green peas in water for 5-6 hrs.
  2. Drain the soaked green peas and grind coarsely with green chillies, ginger, curry leaves and salt without adding water.
  3. Heat oil in a pan and make balls from the dough and deep fry them till golden brown in low to medium heat. Remove from heat and place it on paper towel.
  4. Serve hot with any chutney or sauce.

Image and recipe by: Mamatha Anil @ http://bhakshyabhojana.blogspot.com/


Author: HealthyLife | Posted on: July 6, 2016
« »
« »

Recommended for you

Masala Methi Puri

Masala Methi Puri

Methi  or Fenugreek is highly medicinal, nutritious plant. Fenugreek leaves are good for diabetes condition. Even though, it tastes bitter when cooked it gives good taste and flavor for the food. Adding methi leaves gives good taste and increases nutrition value of puri.

Methi puri recipe:

Total preparation time: 45 minutes

Serves: Four people

Ingredients:

  • 1 cup whole wheat flour
  • 1+1/2 handful all purpose flour
  • 1 cup methi leaves
  • 1/2 tsp ajwain
  • 1 tbsp curd
  • 1/4 cup milk
  • 1/4 spoon sooji rava
  • 1 tbsp oil
  • salt to taste
  • oil for deep frying

Method:

  • Remove the methi leaves from the stems, remove only the leaves and not the stem portion of the plant. If the stem retains then the puri might not fluff up. Wash the leaves and finely chop them and mix in salt and turmeric powder and leave it aside for 5 to 10 mins. Drain excess water from the leaves
  • Mix wheat and all-purpose flour well while adding chopped methi leaves curd, ajwain, sooji rava salt and oil to it and mix well. Pour milk and water in middle and mix the dough and knead well until you get a smooth stiff and pliable dough. Grease oil all over the dough and leave it aside for half an hour.
  • Heat the oil in a frying pan over low flame.
  • Make small round balls out of dough and flatten it using a roller into small puris.
  • Deep fry flattened puris in medium hot oil until puri puff’s up.
  • Serve hot with potato onion curry or curry of your choice.

Potato curry preparation: Boil 4-5 potatoes. Cut yellow or white onion. In a pan take a tbsp of oil and heat the oil. To heated oil, add mustard, curry leaves followed by cut onion and 2-3 green chilies. Add little turmeric. Once the onion cooks, add  smashed potatoes and mix. Add salt for taste and garnish using small cut coriander leaves.

Image courtesy: http://www.thecherryshare.com/pictures


Author: HealthyLife | Posted on: July 2, 2016
« »
« »

Recommended for you

One-Legged King Pigeon Pose

One-Legged King Pigeon Pose

(Eka Pada Rajakapotasana or one legged king pigeon is an advanced asana and takes few weeks to get into the pose. When you connect mind and body and focus your mind in the present you can achieve this pose. This asana brings confidence and peace to the mind as we focus on the body. It opens the chest, hip and stretches hand, thigh and calves muscles. It also gives immense flexibility for the various body parts. This pose is one of the popular pose of yogis.  – Healthylife )

Anatomy:Hips, Shoulders, Spine

Level:Advanced

Pose Type:Backbend, Balance, Hip Opener

Sanskrit: Eka Pada Rajakapotasana (eh-kah pah-dah RAH-jah-kah-poh-TAHS-anna), eka = one, pada = foot or leg, raja = king, kapota = pigeon or dove

BENEFITS

• Stretches the hip flexors, quadriceps, and lower back
• Opens the shoulders and chest
• Rejuvenates the spine
• Brings fresh blood to the pelvic region
• Brings fresh blood to the thyroid, parathyroid, and adrenal glands

CONTRAINDICATIONS

• Knee, spinal, or lower back injuries
• Dislocated shoulder

HOW TO

1. Begin in Adho Mukha Svanasana (Downward-Facing Dog). Bring your right knee to the floor just behind your right hand. Try to bring your shin parallel to the front of your mat. Flex your right foot.

2. Lower your left knee to the floor and slide your left leg back. Come onto your fingertips and walk your hands back until they’re next to your hips. Lengthen your spine.

3. Bend your left knee so the toes are pointing toward the sky.

4. Inhale and reach your right arm toward the sky. Then exhale, bend the elbow, and grasp the left big toe from above. Keep your elbow pointing up. Find your balance here.

5. Inhale and reach your left arm toward the sky. Then exhale, bend the elbow, and grasp the foot. Move your right hand grip from your big toe to the side of your foot.

6. Push your chest forward and lower the top of your head to the sole of your foot.

7. Stay in the pose for several breaths. Then carefully release your hands and lower your foot. Place your palms on the floor and step back to Downward-Facing Dog. Change sides.

MODIFY OR REPLACE

Alternatives:
1. Reclining Pigeon pose
2. Modifications:
3. Rather than holding the foot with both hands, hold the big toe with one hand and the wrist with the other hand.

SEQUENCING TIPS

Before:
1. Adho Mukha Svanasana (Downward-Facing Dog)
2. Reclining Pigeon pose
3. Urdhva Dhanurasana (Wheel pose)

After:
1. Downward-Facing Dog
2. Paschimottanasana (Seated Forward Bend)

TEACHING CUES
• Point your tailbone toward the floor.
• Maintain lift by scissoring the thighs toward each other.
• Draw your navel inward.
• Lift your back ribs.
• Point your elbows toward the sky.

Reference: This article and image both are republished with permission from beyogi.com


Author: HealthyLife | Posted on: June 29, 2016
« »
« »

Recommended for you

Yummy! - Mysore Masala Dosa

Yummy! – Mysore Masala Dosa

A healthy fermented and probiotic dish is dosa. Dosa is made from fermented rice and lentil.  There are many varieties of dosa. But the king of all the dosas are Mysore masala dosa. Mysore is a beautiful city of Karnataka, India and this dosa recipe has originated in a small hotel called Mylari in Mysore. It is touted as one of the best Indian dishes and it is also recommended among the dishes every global citizen should try it once in their life !. This dosa is different and has unique, delicious taste because of the added masala. Inside it has a spongy soft look.  What makes it so tasty? A thick, red, garlic-red chilli chutney is smeared inside the dosa before the masala (potato curry) is filled. A small pat of butter atop the curry and the dosa gets folded, ready to be served with cy !.

Mysore masala dosa recipe:

For Dosa: Ingredients:

  • Raw Rice – 1 & 1/2 cup*
  • Par boiled rice – 1 & 1/2 *
  • Urad dal – 1 cup
  • Chana dal – fistful
  • Methi seeds – 1 tsp
  • Poha – 1/4 cup (optional)
  • Salt to taste

* If you are using Idli rice then you do not need to use raw rice and par boiled rice.  Instead, soak three cups of Idli rice. This gives good taste.

* The ratio of rice to urad daal is 3:1 gives good taste for dosa.

* Do not use long grain rice like Basmathi rice for dosa.

For Potato Masala: Ingredients

  • Potatoes – 2, large, boiled, peeled and cubed
  • Onion – 1, large, sliced
  • Green chilies – 2-3, slit
  • Ginger – 1″, finely minced
  • Turmeric powder – 1/4 tsp
  • Lemon juice – 1 tsp
  • Salt to taste
  • Oil – 1 1/2 tbsps
  • Coriander leaves – 2 tbsps, finely chopped for garnish

For tempering of Potato Masala:

  • Mustard seeds – 1 tsp
  • Urad dal – 1 1/2 tsps
  • Curry leaves – 1 sprig

For Chutney:Ingredients

  • Red chillis – 3
  • Chenna daal – 1/4 cup (dalia/putnala pappu)
  • Toor daal – 1/4 cup
  • Coconut – 1/4 cup, fresh and grated
  • Tamarind – 1 & 1/2 tsps
  • Salt to taste

* If you like garlic in the chutney add couple of garlic cloves.

Preparation:

1) Wash and soak all the dosa ingredients for 5 to 6 hours. Remove the water, add fresh water and grind the ingredients to make dosa batter. Grind it to smooth batter. Test the consistency of batter. It should be semi fluid and you should be able to spread it on the dosa tava. Now, transfer the batter to a large container -there should be enough space for dosa batter fermentation. Add salt and mix well.

2) Keep the batter overnight for fermentation. Keep a aluminum foil or larger plate under container in case the fermented batter overflows. By morning, the fermented batter will be ready to make dosa.

*Batter can be stored for 2 to 3 days.

Potato curry:

1) Boil the potatoes and remove the skin and, cut into small pieces or smash potatoes to small lumps.

2) Cut the onions and green chillis. In a pan put some oil, heat and add mustard, urad daal, chenna daal and when the urad daal turns to slightly golden brown add onion, green chillis and ginger. Fry till the onion cooks.  Now add potato pieces, turmeric powder and salt and, mix well.

3) Remove the curry from the flame. Before serving add lemon juice and garnish with coriander leaves.

Red chutney :

1) Fry red chillis, chenna and toor daal. Add coconut, tamarind, salt and little water and grind the contents.

2) Transfer the chutney to a container and season it by heating little oil. Add mustard, one red chilli, urad daal (1/2 tsp) and curry leaves. If you like the taste of asafetida, then add a pinch of asafetida for the seasoning.

Making dosa:

1) Heat a tava on medium flame. Drizzle little oil on the tava.

2) Take 2 ladles full of dosa batter. In sweeping circular motion, use the back of the ladle to spread it in thick concentric circles. Do not put pressure while spreading the batter. It should be a smooth spread and even.

3) Cook the dosa on medium flame till the base begins to brown. If you prefer drizzle little oil, ghee or apply little butter on dosa. Just before removing the dosa, smear a little red chutney all over the dosa. Place a ladle full of potato curry  on one half side of the dosa, fold the dosa over the potato filling and remove to a serving plate.

4) Serve Mysore masala dosa hot by adding a bit of butter on top alongwith  red chutney or coconut chutney and sambar on the side. It is a very good breakfast item with coffee or can be served as a evening snack item.

Source:


Author: HealthyLife | Posted on:
« »
« »

Recommended for you